
Belajar Linux ID – Tutorial kali ini merupakan lanjutan dari tutorial part 1 sebelumnya berikut: OPENSTACK: INSTALL OPENSTACK QUEENS MULTI-NODE PART 1
Dimana instalasi openstack kali ini menggunakan volume sebesar 30 GB yang akan digunakan untuk:
- LVM Disk: Untuk layanan Block Storage (15 GB)
- XFS Disk: Untuk layanan Share File System Manila (3@5G)
Tahapan ini silakan lakukan di sisi Node Controller.
Create partisi menggunakan perintah fdisk
1
2
3
4
5
6
7
8
9
[root@hamim-controller ~]#
[root@hamim-controller ~]# fdisk /dev/vdb
Welcome to fdisk (util-linux 2.23.2).

Changes will remain in memory only, until you decide to write them.
Be careful before using the write command.

Device does not contain a recognized partition table
Building a new DOS disklabel with disk identifier 0xc30b2e33.
Ketikan perintah “p” untuk print atau melihat tabel partisi.
1
2
3
4
5
6
7
8
9
10
Command (m for help): p

Disk /dev/vdb: 34.4 GB, 34359738368 bytes, 67108864 sectors
Units = sectors of 1 * 512 = 512 bytes
Sector size (logical/physical): 512 bytes / 512 bytes
I/O size (minimum/optimal): 512 bytes / 512 bytes
Disk label type: dos
Disk identifier: 0xc30b2e33

   Device Boot Start End Blocks Id System
Terlihat diatas masih belum ada partisi. Untuk membuat partisi LVM sebesar 15 GB ketikan perintah “n” , lalu “p” untuk pemilihan partisi primary , enter dan enter sampai Last Sector , spesifik size 15 GB tulis +15G
1
2
3
4
5
6
7
8
9
10
Command (m for help): n
Partition type:
   p primary (0 primary, 0 extended, 4 free)
   e extended
Select (default p): p
Partition number (1-4, default 1):
First sector (2048-67108863, default 2048):
Using default value 2048
Last sector, +sectors or +size{K,M,G} (2048-67108863, default 67108863): +15G
Partition 1 of type Linux and of size 15 GiB is set
Ubah tipe partisi menjadi Linux LVM ketikan “p” lalu enter, dan pilih kode “8e” , untuk melihat semua pilihan ketik “L”.
1
2
3
4
5
6
Command (m for help): t
Selected partition 1
Hex code (type L to list all codes): 8e
Changed type of partition 'Linux' to 'Linux LVM'

Command (m for help):
Selanjutnya membuat 3 partisi Linux dengan file system xfs, buat partisi baru menggunakan perintah “n” , enter sampai bari Last Sector , ketik “+5GB”
1
2
3
4
5
6
7
8
9
10
11
12
Command (m for help): n
Partition type:
   p primary (1 primary, 0 extended, 3 free)
   e extended
Select (default p): p
Partition number (2-4, default 2):
First sector (31459328-67108863, default 31459328):
Using default value 31459328
Last sector, +sectors or +size{K,M,G} (31459328-67108863, default 67108863): +5G
Partition 2 of type Linux and of size 5 GiB is set

Command (m for help):
Lakukan sebanyak 3 kali, dan lihat tabel partisi yang sudah kita buat
1
2
3
4
5
6
7
8
9
10
11
12
13
14
Command (m for help): p

Disk /dev/vdb: 34.4 GB, 34359738368 bytes, 67108864 sectors
Units = sectors of 1 * 512 = 512 bytes
Sector size (logical/physical): 512 bytes / 512 bytes
I/O size (minimum/optimal): 512 bytes / 512 bytes
Disk label type: dos
Disk identifier: 0xc30b2e33

   Device Boot Start End Blocks Id System
/dev/vdb1 2048 31459327 15728640 8e Linux LVM
/dev/vdb2 31459328 41945087 5242880 83 Linux
/dev/vdb3 41945088 52430847 5242880 83 Linux
/dev/vdb4 52430848 62916607 5242880 83 Linux
Keluar dan simpan hasil pembuatan partisinya menggunakan perintah “w”
1
2
3
4
5
6
Command (m for help): w
The partition table has been altered!

Calling ioctl() to re-read partition table.
Syncing disks.
[root@hamim-controller ~]#
Inisiasi partisi menggunakan perintah
1
2
[root@hamim-controller ~]#
[root@hamim-controller ~]# partprobe
Lihat partisi menggunakan perintah
1
2
3
4
5
6
7
8
9
10
11
12
13
14
15
16
17
18
19
20
21
22
23
24
25
[root@hamim-controller ~]# fdisk -l

Disk /dev/vda: 64.4 GB, 64424509440 bytes, 125829120 sectors
Units = sectors of 1 * 512 = 512 bytes
Sector size (logical/physical): 512 bytes / 512 bytes
I/O size (minimum/optimal): 512 bytes / 512 bytes
Disk label type: dos
Disk identifier: 0x000acf0a

   Device Boot Start End Blocks Id System
/dev/vda1 * 2048 125829086 62913519+ 83 Linux

Disk /dev/vdb: 34.4 GB, 34359738368 bytes, 67108864 sectors
Units = sectors of 1 * 512 = 512 bytes
Sector size (logical/physical): 512 bytes / 512 bytes
I/O size (minimum/optimal): 512 bytes / 512 bytes
Disk label type: dos
Disk identifier: 0xc30b2e33

   Device Boot Start End Blocks Id System
/dev/vdb1 2048 31459327 15728640 8e Linux LVM
/dev/vdb2 31459328 41945087 5242880 83 Linux
/dev/vdb3 41945088 52430847 5242880 83 Linux
/dev/vdb4 52430848 62916607 5242880 83 Linux
[root@hamim-controller ~]#
Install service lvm2
1
2
[root@hamim-controller ~]#
[root@hamim-controller ~]# yum -y install lvm2
Buat Pysycal Volume LVM menggunakan partisi LVM (/dev/vbd1)
1
2
3
4
[root@hamim-controller ~]#
[root@hamim-controller ~]# pvcreate -f /dev/vdb1
  Physical volume "/dev/vdb1" successfully created.
[root@hamim-controller ~]#
Melihat hasil create Pysycal Volume LVM menggunakan perintah berikut
1
2
3
4
[root@hamim-controller ~]# pvs
  PV VG Fmt Attr PSize PFree
  /dev/vdb1 lvm2 --- 15.00g 15.00g
[root@hamim-controller ~]#
Selanjutnya membuat group volume dengan nama nama cinder-volumes menggunakan perintah
1
2
3
[root@hamim-controller ~]# vgcreate -f cinder-volumes /dev/vdb1
  Volume group "cinder-volumes" successfully created
[root@hamim-controller ~]#
Terakhir, forma file system xfs untuk partisi /dev/vdb2, /dev/vdb3, /dev/vdb4
1
2
3
4
5
6
7
8
9
10
11
12
13
14
15
16
17
18
19
20
21
22
23
24
25
26
27
28
29
30
31
32
33
34
[root@hamim-controller ~]#
[root@hamim-controller ~]# mkfs.xfs /dev/vdb2
meta-data=/dev/vdb2 isize=512 agcount=4, agsize=327680 blks
         = sectsz=512 attr=2, projid32bit=1
         = crc=1 finobt=0, sparse=0
data = bsize=4096 blocks=1310720, imaxpct=25
         = sunit=0 swidth=0 blks
naming =version 2 bsize=4096 ascii-ci=0 ftype=1
log =internal log bsize=4096 blocks=2560, version=2
         = sectsz=512 sunit=0 blks, lazy-count=1
realtime =none extsz=4096 blocks=0, rtextents=0
[root@hamim-controller ~]#
[root@hamim-controller ~]# mkfs.xfs /dev/vdb3
meta-data=/dev/vdb3 isize=512 agcount=4, agsize=327680 blks
         = sectsz=512 attr=2, projid32bit=1
         = crc=1 finobt=0, sparse=0
data = bsize=4096 blocks=1310720, imaxpct=25
         = sunit=0 swidth=0 blks
naming =version 2 bsize=4096 ascii-ci=0 ftype=1
log =internal log bsize=4096 blocks=2560, version=2
         = sectsz=512 sunit=0 blks, lazy-count=1
realtime =none extsz=4096 blocks=0, rtextents=0
[root@hamim-controller ~]#
[root@hamim-controller ~]# mkfs.xfs /dev/vdb4
meta-data=/dev/vdb4 isize=512 agcount=4, agsize=327680 blks
         = sectsz=512 attr=2, projid32bit=1
         = crc=1 finobt=0, sparse=0
data = bsize=4096 blocks=1310720, imaxpct=25
         = sunit=0 swidth=0 blks
naming =version 2 bsize=4096 ascii-ci=0 ftype=1
log =internal log bsize=4096 blocks=2560, version=2
         = sectsz=512 sunit=0 blks, lazy-count=1
realtime =none extsz=4096 blocks=0, rtextents=0
[root@hamim-controller ~]#
Saat ini kita sudah membuat partisi, selanjutnya install openstack-packstack, python-tools dan python-setup-tools menggunakan perintah berikut
1
2
[root@hamim-controller ~]#
[root@hamim-controller ~]# yum -y install openstack-packstack python-tools python-setuptools
Generate file packstack menggunakan perintah berikut
1
2
[root@hamim-controller ~]# packstack --gen-answer-file=packstack.txt
[root@hamim-controller ~]#
Buka file packstack.txt yang sudah di generate
1
2
[root@hamim-controller ~]#
[root@hamim-controller ~]# vim packstack.txt
Konfigurasi file packstack pada baris dibawah ini, silakand disesuaikan
1
2
3
4
5
6
7
8
9
10
11
12
13
14
15
CONFIG_CEILOMETER_INSTALL=n
CONFIG_AODH_INSTALL=n
CONFIG_MANILA_INSTALL=n
CONFIG_COMPUTE_HOSTS=10.36.36.20
#CONFIG_KEYSTONE_ADMIN_PW=9288844cb55f4c64
CONFIG_KEYSTONE_ADMIN_PW=secret
#CONFIG_NOVA_LIBVIRT_VIRT_TYPE=%{::default_hypervisor}
CONFIG_NOVA_LIBVIRT_VIRT_TYPE=qemu
CONFIG_NEUTRON_OVS_BRIDGE_IFACES=br-ex:eth1
CONFIG_NEUTRON_OVS_BRIDGES_COMPUTE=br-ex
CONFIG_PROVISION_DEMO=n
CONFIG_CINDER_VOLUMES_CREATE=n
CONFIG_SWIFT_STORAGES=/dev/vdb2,/dev/vdb3,/dev/vdb4
CONFIG_SWIFT_STORAGE_REPLICAS=2
CONFIG_SWIFT_STORAGE_FSTYPE=xfs
Sebelum melakukan instalasi pastikan paket leatherman sudah ada jika masih belum seperti berikut
1
2
3
4
5
6
[root@hamim-controller ~]#
[root@hamim-controller ~]# yum list | grep leatherman
Failed to set locale, defaulting to C
leatherman.x86_64 1.10.0-1.el7 @epel
leatherman-devel.x86_64 1.10.0-1.el7 epel
[root@hamim-controller ~]#
Silakan downgrade menggunakan perintah berikut, dan lihat perbedaannya
1
2
3
4
5
6
7
8
9
[root@hamim-controller ~]# yum downgrade leatherman -y

[root@hamim-controller ~]#
[root@hamim-controller ~]# yum list | grep leatherman
Failed to set locale, defaulting to C
leatherman.x86_64 1.3.0-9.el7 @centos-openstack-queens
leatherman.x86_64 1.10.0-1.el7 epel
leatherman-devel.x86_64 1.10.0-1.el7 epel
[root@hamim-controller ~]#
Testing menggunakan perintah berikut
1
[root@hamim-controller ~]# facter -p
Silahkan dipastikan di Node Compute
1
2
3
4
5
6
7
[root@hamim-compute ~]#
[root@hamim-compute ~]# yum list | grep leatherman
Failed to set locale, defaulting to C
leatherman.x86_64 1.3.0-9.el7 @centos-openstack-queens
leatherman.x86_64 1.10.0-1.el7 epel
leatherman-devel.x86_64 1.10.0-1.el7 epel
[root@hamim-compute ~]#
Selanjutnya install packstack menggunakan screen seperti berikut ini
1
2
3
4
5
[root@hamim-controller ~]# screen -R openstack
[root@hamim-controller ~]# ls
anaconda-ks.cfg original-ks.cfg packstack.txt
[root@hamim-controller ~]#
[root@hamim-controller ~]# packstack --answer-file=packstack.txt
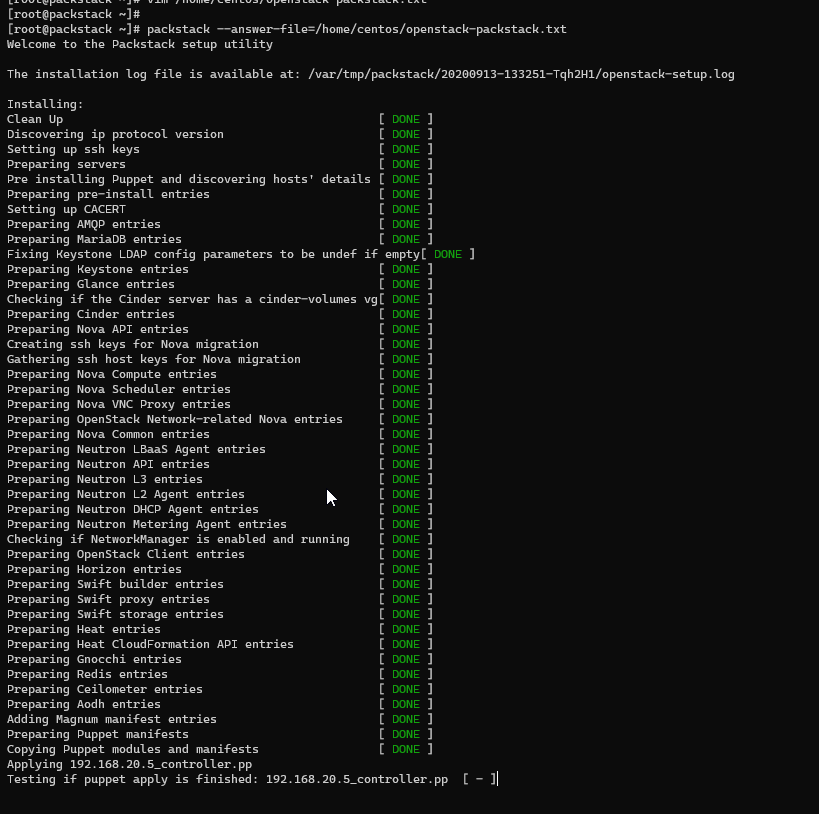
Tunggu proses instalasi yang membutuhkan waktu dan pastikan instalasi selesai dan jika berhasil Anda akan mendapatkan informasi seperti berikut
1
2
3
4
5
6
7
8
9
10
11
12
13
Applying Puppet manifests [DONE]
Finalizing [DONE]

 ****Installation completed successfully******

Additional information:
 * Time synchronization installation was skipped. Please note that unsynchronized time on server instances might be problem for some OpenStack components.
 * File /root/keystonerc_admin has been created on OpenStack client host 10.36.36.10. To use the command line tools you need to source the file.
 * To access the OpenStack Dashboard browse to http://10.36.36.10/dashboard .
Please, find your login credentials stored in the keystonerc_admin in your home directory.
 * The installation log file is available at: /var/tmp/packstack/20200922-045931-OQLFwY/openstack-setup.log
 * The generated manifests are available at: /var/tmp/packstack/20200922-045931-OQLFwY/manifests
[root@hamim-controller ~]#
Sekian untuk tutorial part 2 silakan lanjut ke part 3 ya 😁