
Tutorial kali ini kita akan mencoba bagaimana cara melakukan mounting sebuah volume atau bisa dikatakan sebagai disk atau drive tambahan pada instance atau VM atau VPS.
OS yang kami gunakan yaitu CentOS 8 non-LVM dimana untuk volume tambahan nantinya tidak kami mounting sebagai root melainkan direktori yang lainnya misal direktori /home atau yang lainnya.
Untuk melakukan mounting volume pastikan Anda sudah attach volume ke sisi instance Anda masing – masing, setelah itu Anda dapat menggunakan command berikut, untuk melihat volume tambahan yang belum di mounting.
1
2
[root@raid-belajarlinux ~]#
[root@raid-belajarlinux ~]# fdisk -l
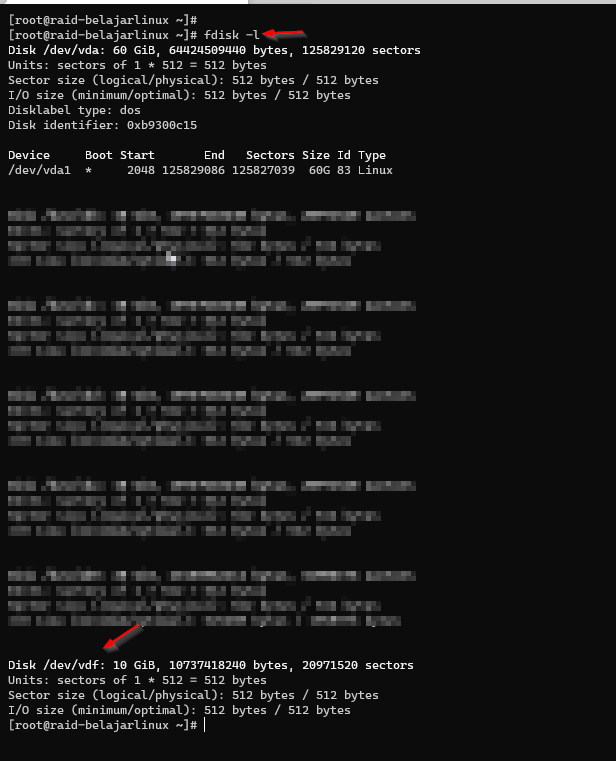
Gambar diatas terlihat terdapat 10GB volume dengan filesystem /dev/vdf untuk menjadikan filesystem tersebut menjadi type Ext4 dapat di lakukan menggunakan perintah fdisk
1
2
3
4
5
6
7
8
9
10
[root@raid-belajarlinux ~]# fdisk /dev/vdf

Welcome to fdisk (util-linux 2.32.1).
Changes will remain in memory only, until you decide to write them.
Be careful before using the write command.

Device does not contain a recognized partition table.
Created a new DOS disklabel with disk identifier 0x475334df.

Command (m for help):
Noted: silakan disesuaikan dengan typefilesystem Anda
Selanjutnya membuat partisi baru dengan perintah n lalu p (primary) dan pilih number partisi nya (default 1).
1
2
3
4
5
6
7
8
9
10
11
12
Command (m for help): n
Partition type
   p primary (0 primary, 0 extended, 4 free)
   e extended (container for logical partitions)
Select (default p): p
Partition number (1-4, default 1): 1
First sector (2048-20971519, default 2048):
Last sector, +sectors or +size{K,M,G,T,P} (2048-20971519, default 20971519):

Created a new partition 1 of type 'Linux' and of size 10 GiB.

Command (m for help):
Saat ini partisi baru sudah berhasil dibuat silakan ketik t untuk mengubah system id partisi dan ketik L untuk melihat id partisi dan pilih 83 untuk sistem id Linux
1
2
3
4
5
6
7
8
9
10
11
12
13
14
15
16
17
18
19
20
21
22
23
24
25
26
27
28
29
30
31
32
33
Command (m for help): t
Selected partition 1
Hex code (type L to list all codes): L

 0 Empty 24 NEC DOS 81 Minix / old Lin bf Solaris
 1 FAT12 27 Hidden NTFS Win 82 Linux swap / So c1 DRDOS/sec (FAT-
 2 XENIX root 39 Plan 9 83 Linux c4 DRDOS/sec (FAT-
 3 XENIX usr 3c PartitionMagic 84 OS/2 hidden or c6 DRDOS/sec (FAT-
 4 FAT16 <32M 40 Venix 80286 85 Linux extended c7 Syrinx
 5 Extended 41 PPC PReP Boot 86 NTFS volume set da Non-FS data
 6 FAT16 42 SFS 87 NTFS volume set db CP/M / CTOS / .
 7 HPFS/NTFS/exFAT 4d QNX4.x 88 Linux plaintext de Dell Utility
 8 AIX 4e QNX4.x 2nd part 8e Linux LVM df BootIt
 9 AIX bootable 4f QNX4.x 3rd part 93 Amoeba e1 DOS access
 a OS/2 Boot Manag 50 OnTrack DM 94 Amoeba BBT e3 DOS R/O
 b W95 FAT32 51 OnTrack DM6 Aux 9f BSD/OS e4 SpeedStor
 c W95 FAT32 (LBA) 52 CP/M a0 IBM Thinkpad hi ea Rufus alignment
 e W95 FAT16 (LBA) 53 OnTrack DM6 Aux a5 FreeBSD eb BeOS fs
 f W95 Ext'd (LBA) 54 OnTrackDM6 a6 OpenBSD ee GPT
10 OPUS 55 EZ-Drive a7 NeXTSTEP ef EFI (FAT-12/16/
11 Hidden FAT12 56 Golden Bow a8 Darwin UFS f0 Linux/PA-RISC b
12 Compaq diagnost 5c Priam Edisk a9 NetBSD f1 SpeedStor
14 Hidden FAT16 <3 61 SpeedStor ab Darwin boot f4 SpeedStor
16 Hidden FAT16 63 GNU HURD or Sys af HFS / HFS+ f2 DOS secondary
17 Hidden HPFS/NTF 64 Novell Netware b7 BSDI fs fb VMware VMFS
18 AST SmartSleep 65 Novell Netware b8 BSDI swap fc VMware VMKCORE
1b Hidden W95 FAT3 70 DiskSecure Mult bb Boot Wizard hid fd Linux raid auto
1c Hidden W95 FAT3 75 PC/IX bc Acronis FAT32 L fe LANstep
1e Hidden W95 FAT1 80 Old Minix be Solaris boot ff BBT
Hex code (type L to list all codes): 83
Changed type of partition 'Linux' to 'Linux'.

Command (m for help):
Selanjutnya ketikan w untuk menyimpan partisi yang sudah ditentukan
1
2
3
4
5
6
Command (m for help): w
The partition table has been altered.
Calling ioctl() to re-read partition table.
Syncing disks.

[root@raid-belajarlinux ~]#
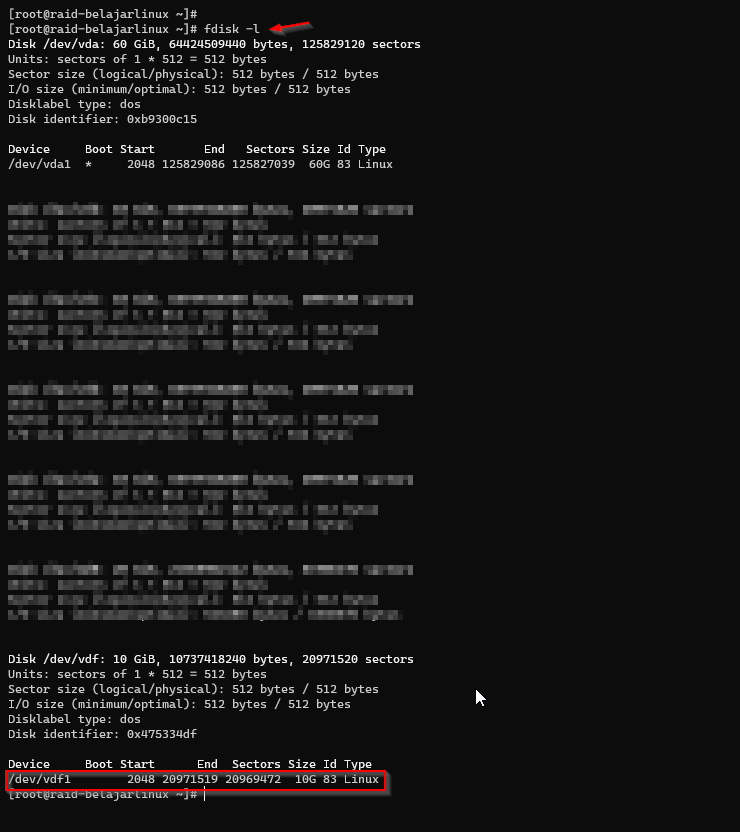
Sekarang kita coba jalankan kembali perintah fdisk -l dan hasilnya akan ada partisi baru seperti berikut
1
2
[root@raid-belajarlinux ~]#
[root@raid-belajarlinux ~]# fdisk -l
Jika partisi diatas ingin kita ubah menjadi system type ext4 gunakan perintah berikut
1
2
3
4
5
6
7
8
9
10
11
12
13
14
15
16
17
18
19
[root@raid-belajarlinux ~]#
[root@raid-belajarlinux ~]# fdisk -l |grep /dev/vdf1
/dev/vdf1 2048 20971519 20969472 10G 83 Linux
[root@raid-belajarlinux ~]#
[root@raid-belajarlinux ~]# mkfs.ext4 /dev/vdf1
mke2fs 1.45.4 (23-Sep-2019)
Creating filesystem with 2621184 4k blocks and 655360 inodes
Filesystem UUID: 1fb495df-7a5a-4d3c-b0d8-9a6b0ea49108
Superblock backups stored on blocks:
        32768, 98304, 163840, 229376, 294912, 819200, 884736, 1605632

Allocating group tables: done
Writing inode tables: done
Creating journal (16384 blocks):
done
Writing superblocks and filesystem accounting information: done

[root@raid-belajarlinux ~]#
[root@raid-belajarlinux ~]#
Noted: Pastikan nama filsystem dari partisinya sudah sesuai
Saat ini partisi sudah dibuat disini Anda dapat mount partisi tersebut ke /home atau ke direktori yang lainnya, misalnya disini kami akan buat direktori khusus kami berikan nama direktori non-raid yang berada di root
1
2
[root@raid-belajarlinux ~]#
[root@raid-belajarlinux ~]# mkdir non-raid
Mounting volume ke direktori non-raid
1
[root@raid-belajarlinux ~]# mount /dev/vdf1 non-raid/
Silakan cek hasil mounting nya menggunakan df -h
1
2
3
4
[root@raid-belajarlinux ~]#
[root@raid-belajarlinux ~]# df -hT |grep non-raid
/dev/vdf1 ext4 9.8G 37M 9.3G 1% /root/non-raid
[root@raid-belajarlinux ~]#
Saat ini volume dengan filesystem /dev/vdf1 type ext4 sudah ter-mounting ke direktori non-raid.
Langkah terakhir supaya volume tidak lepas secara otomatis pada saat instance/vm di reboot Anda dapat menambahkan filesystem tersebut ke fstab
1
2
[root@raid-belajarlinux ~]#
[root@raid-belajarlinux ~]# vim /etc/fstab
Berikut contoh penambahan di sisi fstab
1
2
3
4
5
6
7
8
9
10
11
12
13
#
# /etc/fstab
# Created by anaconda on Mon Jan 13 21:48:59 2020
#
# Accessible filesystems, by reference, are maintained under '/dev/disk/'.
# See man pages fstab(5), findfs(8), mount(8) and/or blkid(8) for more info.
#
# After editing this file, run 'systemctl daemon-reload' to update systemd
# units generated from this file.
#
UUID=c7b1ead0-f176-4f23-b9c7-299eb4a06cef / xfs defaults 0 0
/dev/md0 /home ext4 defaults 0 0
/dev/vdf1 /root/non-raid ext4 defaults 0 0
Verifikasi fstab, pastikan termounted semua ya
1
2
3
4
5
6
[root@raid-belajarlinux ~]#
[root@raid-belajarlinux ~]# mount -av
/ : ignored
/home : already mounted
/root/non-raid : already mounted
[root@raid-belajarlinux ~]#
Untuk memastikannya volume tidak lepas setelah instance di reboot silakan reboot instance Anda sekarang
1
2
3
4
5
[root@raid-belajarlinux ~]#
[root@raid-belajarlinux ~]# reboot
Connection to 192.168.10.9 closed by remote host.
Connection to 192.168.10.9 closed.
ubuntu@my-jumper:~$
Remote kembali instance/VM Anda dan jalankan df -h untuk memeriksanya
1
2
3
4
5
6
7
8
9
10
11
12
13
14
15
16
17
18
19
ubuntu@my-jumper:~$
ubuntu@my-jumper:~$ ssh raid
centos@192.168.10.9's password:
Activate the web console with: systemctl enable --now cockpit.socket

Last login: Sat Sep 12 16:47:11 2020 from 192.168.10.7
Could not chdir to home directory /home/centos: No such file or directory
[centos@raid-belajarlinux /]$
[centos@raid-belajarlinux /]$ sudo su
[root@raid-belajarlinux /]#
[root@raid-belajarlinux /]# df -h
Filesystem Size Used Avail Use% Mounted on
devtmpfs 886M 0 886M 0% /dev
tmpfs 914M 0 914M 0% /dev/shm
tmpfs 914M 8.5M 905M 1% /run
tmpfs 914M 0 914M 0% /sys/fs/cgroup
/dev/vda1 60G 2.4G 58G 4% /
/dev/vdf1 9.8G 37M 9.3G 1% /root/non-raid
/dev/md0 20G 45M 19G 1% /home
Selamat volume Anda sudah berhasil di mounting dengan baik.
Selamat mencoba 😁