
Belajar Linux ID - Linux container (LXD) saat ini sudah menyediakan fitur clustering (pengelompokan) yang sangat solid yang membutuhkan minimal 3 server dalam implementasinya.
LXD menggunakan Raft untuk skema clustering-nya dimana terdapat 1 server sebagai (leader/node-utama) dan node yang lain menjadi (follower/join-node) atau node yang bergabung ke dalam cluster (kelompok) node-utama.
Berikut contoh topologi sederhana dalam implementasi cluster LXD
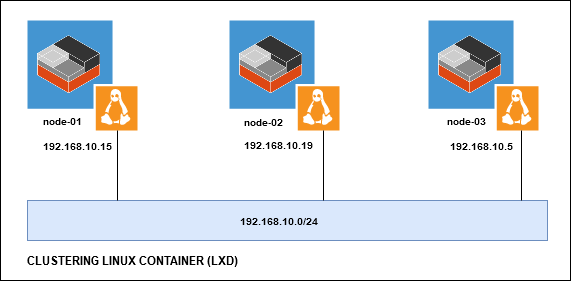
Keterangan: Terdapat 3 node dalam implementasi kali ini dimana Node-01 digunakan sebagai node-utama (leader) dan node-02, node-03 sebagai (follower) nantinya ke dua node ini akan join ke Node-01 atau node-utama
Berikut pembagian IP dan hostname dari ke tiga node tersebut:
-
Node01-lxd-blinux IP: 192.168.10.15 103.xx.xx.117 - Node02-lxd-blinux IP: 192.168.10.19
- Node03–lxd-blinux IP: 192.168.10.5
Berikut tahapan untuk membuat cluster LXD:
Langkah yang paling utama yaitu melakukan instalasi LXD di masing-masing node
1
2
3
4
5
6
7
8
9
10
11
12
13
14
15
16
17
## Node-01
ubuntu@node01-lxd-blinux:~$ sudo apt update
ubuntu@node01-lxd-blinux:~$ sudo apt-get purge lxd lxd-client -y
ubuntu@node01-lxd-blinux:~$ sudo apt-get install zfsutils-linux -y
ubuntu@node01-lxd-blinux:~$ sudo snap install lxd

## Node-02
ubuntu@node02-lxd-blinux:~$ sudo apt update
ubuntu@node02-lxd-blinux:~$ sudo apt-get purge lxd lxd-client -y
ubuntu@node02-lxd-blinux:~$ sudo apt-get install zfsutils-linux -y
ubuntu@node02-lxd-blinux:~$ sudo snap install lxd

# Node-03
ubuntu@node03-lxd-blinux:~$ sudo apt update
ubuntu@node03-lxd-blinux:~$ sudo apt-get purge lxd lxd-client -y
ubuntu@node03-lxd-blinux:~$ sudo apt-get install zfsutils-linux -y
ubuntu@node03-lxd-blinux:~$ sudo snap install lxd
Node-01
Selanjutnya melakukan konfigurasi cluster pada node utama atau (node-01) dengan 2 cara yang dapat dipilih. Cara yang pertama bisa menggunakan wizard dengan mengeksekusi perintah sudo lxd init dan cara yang ke dua menggunakan file preseed yang akan digunakan untuk setup.
Pada tutorial kali ini kami menggunakan cara yang pertama sebagai berikut:
Membuat network bridge yang akan digunakan oleh linux container nantinya
1
2
3
4
5
6
ubuntu@node01-lxd-blinux:~$ lxc network create lxdbr0 ipv6.address=none ipv4.address=10.0.0.1/24 ipv4.nat=true
If this is your first time running LXD on this machine, you should also run: lxd init
To start your first instance, try: lxc launch ubuntu:18.04

Network lxdbr0 created
ubuntu@node01-lxd-blinux:~$
Konfigurasi cluster node-01
1
2
3
4
5
6
7
8
9
10
11
12
13
14
15
16
17
18
19
20
ubuntu@node01-lxd-blinux:~$ lxd init
Would you like to use LXD clustering? (yes/no) [default=no]: yes
What name should be used to identify this node in the cluster? [default=node01-lxd-blinux]: node-01
What IP address or DNS name should be used to reach this node? [default=192.168.10.15]:
Are you joining an existing cluster? (yes/no) [default=no]:
Setup password authentication on the cluster? (yes/no) [default=yes]:
Trust password for new clients:
Again:
Do you want to configure a new local storage pool? (yes/no) [default=yes]:
Name of the storage backend to use (btrfs, dir, lvm, zfs) [default=zfs]:
Create a new ZFS pool? (yes/no) [default=yes]:
Would you like to use an existing block device? (yes/no) [default=no]:
Size in GB of the new loop device (1GB minimum) [default=15GB]: 50GB
Do you want to configure a new remote storage pool? (yes/no) [default=no]:
Would you like to connect to a MAAS server? (yes/no) [default=no]:
Would you like to configure LXD to use an existing bridge or host interface? (yes/no) [default=no]: yes
Name of the existing bridge or host interface: lxdbr0
Would you like stale cached images to be updated automatically? (yes/no) [default=yes]
Would you like a YAML "lxd init" preseed to be printed? (yes/no) [default=no]:
ubuntu@node01-lxd-blinux:~$
Noted: Pada bagian Trust password for new clients: pastikan Anda mengimput password dengan benar dan harap dicatat karena password tersebut akan digunakan nantinya pada saat join cluster. Untuk yang lainnya dapat disesuaikan dengan kondisi masing-masing seperti interface, network, storage dan yang lainnya.
Node-02 & Node-03
Apabila Anda sudah setup node utama seperti diatas maka untuk melakukan join cluster ke node utama hampir sama caranya seperti diatas bedanya pada saat pertanyaan berikut: Are you joining an existing cluster? (yes/no) [default=no]: silakan pilih yes seperti berikut
1
2
3
4
5
6
7
8
9
10
11
12
13
14
15
16
17
18
19
20
21
22
23
24
25
26
27
28
29
30
31
32
33
34
35
## Join node 02
ubuntu@node02-lxd-blinux:~$ sudo lxd init
Would you like to use LXD clustering? (yes/no) [default=no]: yes
What name should be used to identify this node in the cluster? [default=node02-lxd-blinux]: node-02
What IP address or DNS name should be used to reach this node? [default=192.168.10.19]:
Are you joining an existing cluster? (yes/no) [default=no]: yes
IP address or FQDN of an existing cluster node: 192.168.10.15
Cluster fingerprint: daa6ace680f4cd4da99b88ee87ae54bf3861d9d07d9f4590c53b0d894f4fd938
You can validate this fingerprint by running "lxc info" locally on an existing node.
Is this the correct fingerprint? (yes/no) [default=no]: yes
Cluster trust password:
All existing data is lost when joining a cluster, continue? (yes/no) [default=no] yes
Choose "size" property for storage pool "local": 50GB
Choose "source" property for storage pool "local":
Choose "zfs.pool_name" property for storage pool "local":
Would you like a YAML "lxd init" preseed to be printed? (yes/no) [default=no]:
ubuntu@node02-lxd-blinux:~$

# Join Node 03
ubuntu@node03-lxd-blinux:~$ sudo lxd init
Would you like to use LXD clustering? (yes/no) [default=no]: yes
What name should be used to identify this node in the cluster? [default=node03-lxd-blinux]: node-03
What IP address or DNS name should be used to reach this node? [default=192.168.10.5]:
Are you joining an existing cluster? (yes/no) [default=no]: yes
IP address or FQDN of an existing cluster node: 192.168.10.15
Cluster fingerprint: daa6ace680f4cd4da99b88ee87ae54bf3861d9d07d9f4590c53b0d894f4fd938
You can validate this fingerprint by running "lxc info" locally on an existing node.
Is this the correct fingerprint? (yes/no) [default=no]: yes
Cluster trust password:
All existing data is lost when joining a cluster, continue? (yes/no) [default=no] yes
Choose "size" property for storage pool "local": 50GB
Choose "source" property for storage pool "local":
Choose "zfs.pool_name" property for storage pool "local":
Would you like a YAML "lxd init" preseed to be printed? (yes/no) [default=no]:
ubuntu@node03-lxd-blinux:~$
Noted:
- IP address or FQDN of an existing cluster node: Pada bagian ini silakan input IP Node-01 (utama)
- Cluster trust password: Pada bagian ini silakan input password yang sudah di setup di Node-01 (utama)
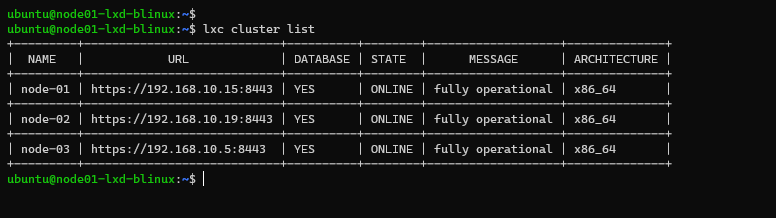
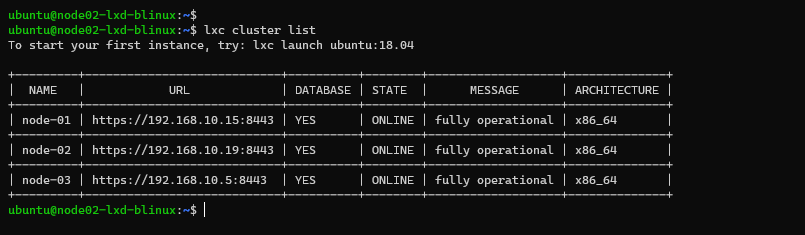
Sampai disini setup cluster di linux container (LXD) sudah selesai dilakukan, sekarang kita verifikasi di masing-masing node dengan cara menjalankan perintah lxc cluster list untuk melihat cluster
Node-01
Node-02
Node-03
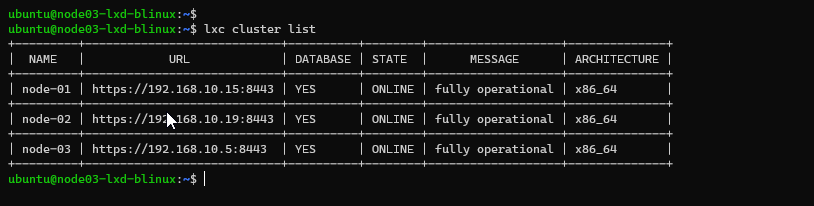
Keterangan:
- NAME: Nama Node cluster
- URL: URL API untuk komunikasi antar node
- DATABASE: Database node cluster LXD
- STATE: Status cluster
- MESSAGE: Informasi dari node cluster
- ARCHITECTURE: Arsitektur yang digunakan dalam cluster LXD
Membuat Container LXD
Tahapan selanjutnya kita akan menguji coba membuat linux container
1
2
3
4
5
6
7
8
9
10
11
ubuntu@node01-lxd-blinux:~$
ubuntu@node01-lxd-blinux:~$ lxc launch ubuntu:18.04 container-01
Creating container-01
Starting container-01
ubuntu@node01-lxd-blinux:~$ lxc launch ubuntu:18.04 container-02
Creating container-02
Starting container-02
ubuntu@node01-lxd-blinux:~$ lxc launch ubuntu:18.04 container-03
Creating container-03
Starting container-03
ubuntu@node01-lxd-blinux:~$
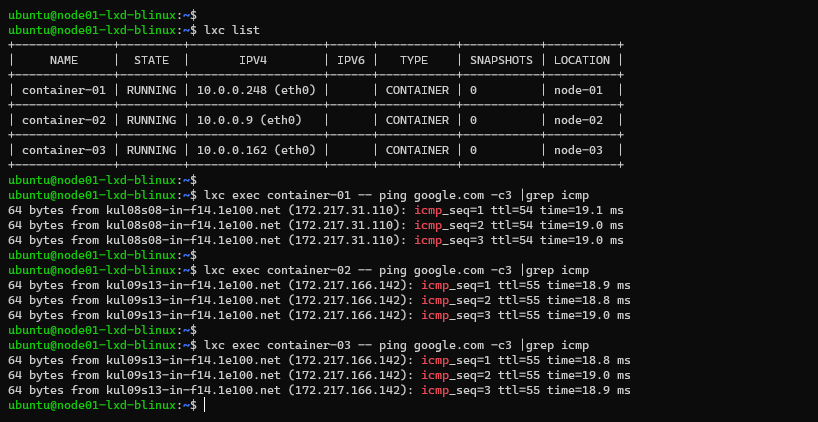
Lihat list container di masing-masing node dan eksekusi ping ke ip container
1
2
3
4
5
6
7
8
9
10
11
12
13
14
15
16
17
18
19
20
21
22
23
24
25
26
27
28
29
## Node01

ubuntu@node01-lxd-blinux:~$
ubuntu@node01-lxd-blinux:~$ lxc list
+--------------+---------+-------------------+------+-----------+-----------+----------+
|     NAME     |  STATE  |       IPV4        | IPV6 |   TYPE    | SNAPSHOTS | LOCATION |
+--------------+---------+-------------------+------+-----------+-----------+----------+
| container-01 | RUNNING | 10.0.0.248 (eth0) |      | CONTAINER | 0         | node-01  |
+--------------+---------+-------------------+------+-----------+-----------+----------+
| container-02 | RUNNING | 10.0.0.9 (eth0)   |      | CONTAINER | 0         | node-02  |
+--------------+---------+-------------------+------+-----------+-----------+----------+
| container-03 | RUNNING | 10.0.0.162 (eth0) |      | CONTAINER | 0         | node-03  |
+--------------+---------+-------------------+------+-----------+-----------+----------+
ubuntu@node01-lxd-blinux:~$
ubuntu@node01-lxd-blinux:~$ lxc exec container-01 -- ping google.com -c3 |grep icmp
64 bytes from kul08s08-in-f14.1e100.net (172.217.31.110): icmp_seq=1 ttl=54 time=19.1 ms
64 bytes from kul08s08-in-f14.1e100.net (172.217.31.110): icmp_seq=2 ttl=54 time=19.0 ms
64 bytes from kul08s08-in-f14.1e100.net (172.217.31.110): icmp_seq=3 ttl=54 time=19.0 ms
ubuntu@node01-lxd-blinux:~$
ubuntu@node01-lxd-blinux:~$ lxc exec container-02 -- ping google.com -c3 |grep icmp
64 bytes from kul09s13-in-f14.1e100.net (172.217.166.142): icmp_seq=1 ttl=55 time=18.9 ms
64 bytes from kul09s13-in-f14.1e100.net (172.217.166.142): icmp_seq=2 ttl=55 time=18.8 ms
64 bytes from kul09s13-in-f14.1e100.net (172.217.166.142): icmp_seq=3 ttl=55 time=19.0 ms
ubuntu@node01-lxd-blinux:~$
ubuntu@node01-lxd-blinux:~$ lxc exec container-03 -- ping google.com -c3 |grep icmp
64 bytes from kul09s13-in-f14.1e100.net (172.217.166.142): icmp_seq=1 ttl=55 time=18.8 ms
64 bytes from kul09s13-in-f14.1e100.net (172.217.166.142): icmp_seq=2 ttl=55 time=19.0 ms
64 bytes from kul09s13-in-f14.1e100.net (172.217.166.142): icmp_seq=3 ttl=55 time=18.9 ms
ubuntu@node01-lxd-blinux:~$
1
2
3
4
5
6
7
8
9
10
11
12
13
14
15
16
17
18
19
20
21
22
23
24
25
26
27
28
29
## Node02

ubuntu@node02-lxd-blinux:~$
ubuntu@node02-lxd-blinux:~$ lxc list
+--------------+---------+-------------------+------+-----------+-----------+----------+
|     NAME     |  STATE  |       IPV4        | IPV6 |   TYPE    | SNAPSHOTS | LOCATION |
+--------------+---------+-------------------+------+-----------+-----------+----------+
| container-01 | RUNNING | 10.0.0.248 (eth0) |      | CONTAINER | 0         | node-01  |
+--------------+---------+-------------------+------+-----------+-----------+----------+
| container-02 | RUNNING | 10.0.0.9 (eth0)   |      | CONTAINER | 0         | node-02  |
+--------------+---------+-------------------+------+-----------+-----------+----------+
| container-03 | RUNNING | 10.0.0.162 (eth0) |      | CONTAINER | 0         | node-03  |
+--------------+---------+-------------------+------+-----------+-----------+----------+
ubuntu@node02-lxd-blinux:~$
ubuntu@node02-lxd-blinux:~$ lxc exec container-01 -- ping google.com -c3 |grep icmp
64 bytes from kul08s08-in-f14.1e100.net (172.217.31.110): icmp_seq=1 ttl=54 time=19.0 ms
64 bytes from kul08s08-in-f14.1e100.net (172.217.31.110): icmp_seq=2 ttl=54 time=19.0 ms
64 bytes from kul08s08-in-f14.1e100.net (172.217.31.110): icmp_seq=3 ttl=54 time=19.1 ms
ubuntu@node02-lxd-blinux:~$
ubuntu@node02-lxd-blinux:~$ lxc exec container-02 -- ping google.com -c3 |grep icmp
64 bytes from kul09s13-in-f14.1e100.net (172.217.166.142): icmp_seq=1 ttl=55 time=20.8 ms
64 bytes from kul09s13-in-f14.1e100.net (172.217.166.142): icmp_seq=2 ttl=55 time=18.8 ms
64 bytes from kul09s13-in-f14.1e100.net (172.217.166.142): icmp_seq=3 ttl=55 time=19.1 ms
ubuntu@node02-lxd-blinux:~$
ubuntu@node02-lxd-blinux:~$ lxc exec container-03 -- ping google.com -c3 |grep icmp
64 bytes from kul09s13-in-f14.1e100.net (172.217.166.142): icmp_seq=1 ttl=55 time=20.1 ms
64 bytes from kul09s13-in-f14.1e100.net (172.217.166.142): icmp_seq=2 ttl=55 time=19.0 ms
64 bytes from kul09s13-in-f14.1e100.net (172.217.166.142): icmp_seq=3 ttl=55 time=18.9 ms
ubuntu@node02-lxd-blinux:~$

1
2
3
4
5
6
7
8
9
10
11
12
13
14
15
16
17
18
19
20
21
22
23
24
25
26
27
28
29
## Node03

ubuntu@node03-lxd-blinux:~$
ubuntu@node03-lxd-blinux:~$ lxc list
+--------------+---------+-------------------+------+-----------+-----------+----------+
|     NAME     |  STATE  |       IPV4        | IPV6 |   TYPE    | SNAPSHOTS | LOCATION |
+--------------+---------+-------------------+------+-----------+-----------+----------+
| container-01 | RUNNING | 10.0.0.248 (eth0) |      | CONTAINER | 0         | node-01  |
+--------------+---------+-------------------+------+-----------+-----------+----------+
| container-02 | RUNNING | 10.0.0.9 (eth0)   |      | CONTAINER | 0         | node-02  |
+--------------+---------+-------------------+------+-----------+-----------+----------+
| container-03 | RUNNING | 10.0.0.162 (eth0) |      | CONTAINER | 0         | node-03  |
+--------------+---------+-------------------+------+-----------+-----------+----------+
ubuntu@node03-lxd-blinux:~$
ubuntu@node03-lxd-blinux:~$ lxc exec container-01 -- ping google.com -c3 |grep icmp
64 bytes from kul08s08-in-f14.1e100.net (172.217.31.110): icmp_seq=1 ttl=54 time=19.3 ms
64 bytes from kul08s08-in-f14.1e100.net (172.217.31.110): icmp_seq=2 ttl=54 time=19.1 ms
64 bytes from kul08s08-in-f14.1e100.net (172.217.31.110): icmp_seq=3 ttl=54 time=19.1 ms
ubuntu@node03-lxd-blinux:~$
ubuntu@node03-lxd-blinux:~$ lxc exec container-02 -- ping google.com -c3 |grep icmp
64 bytes from kul09s13-in-f14.1e100.net (172.217.166.142): icmp_seq=1 ttl=55 time=18.9 ms
64 bytes from kul09s13-in-f14.1e100.net (172.217.166.142): icmp_seq=2 ttl=55 time=18.9 ms
64 bytes from kul09s13-in-f14.1e100.net (172.217.166.142): icmp_seq=3 ttl=55 time=19.0 ms
ubuntu@node03-lxd-blinux:~$
ubuntu@node03-lxd-blinux:~$ lxc exec container-03 -- ping google.com -c3 |grep icmp
64 bytes from kul09s13-in-f14.1e100.net (172.217.166.142): icmp_seq=1 ttl=55 time=19.3 ms
64 bytes from kul09s13-in-f14.1e100.net (172.217.166.142): icmp_seq=2 ttl=55 time=18.9 ms
64 bytes from kul09s13-in-f14.1e100.net (172.217.166.142): icmp_seq=3 ttl=55 time=18.9 ms
ubuntu@node03-lxd-blinux:~$
Dari ke tiga linux container Anda dapat melihat setiap linux container akan di sebar ke masing-masing node karena algoritma yang digunakan yaitu round-robin.
Apabila Anda ingin membuat linux container ke spesifik node dapat dilakukan dengan cara menambahkan opsi --target [node] pada saat membuat linux container contohnya:
1
2
3
4
5
6
7
8
9
10
11
12
13
14
15
16
ubuntu@node01-lxd-blinux:~$ lxc launch ubuntu:18.04 container-04 --target node-03
Creating container-04
Starting container-04
ubuntu@node01-lxd-blinux:~$ lxc list
+--------------+---------+-------------------+------+-----------+-----------+----------+
|     NAME     |  STATE  |       IPV4        | IPV6 |   TYPE    | SNAPSHOTS | LOCATION |
+--------------+---------+-------------------+------+-----------+-----------+----------+
| container-01 | RUNNING | 10.0.0.248 (eth0) |      | CONTAINER | 0         | node-01  |
+--------------+---------+-------------------+------+-----------+-----------+----------+
| container-02 | RUNNING | 10.0.0.9 (eth0)   |      | CONTAINER | 0         | node-02  |
+--------------+---------+-------------------+------+-----------+-----------+----------+
| container-03 | RUNNING | 10.0.0.162 (eth0) |      | CONTAINER | 0         | node-03  |
+--------------+---------+-------------------+------+-----------+-----------+----------+
| container-04 | RUNNING | 10.0.0.78 (eth0)  |      | CONTAINER | 0         | node-03  |
+--------------+---------+-------------------+------+-----------+-----------+----------+
ubuntu@node01-lxd-blinux:~$
Terlihat saat ini di node-03 sudah terisi dua linux container silakan login ke linux container-04 dan test ping
1
2
3
4
5
6
7
8
9
10
11
12
13
ubuntu@node01-lxd-blinux:~$
ubuntu@node01-lxd-blinux:~$ lxc exec container-04 bash
root@container-04:~#
root@container-04:~# ping 10.0.0.78 -c3 |grep icmp
64 bytes from 10.0.0.78: icmp_seq=1 ttl=64 time=0.076 ms
64 bytes from 10.0.0.78: icmp_seq=2 ttl=64 time=0.071 ms
64 bytes from 10.0.0.78: icmp_seq=3 ttl=64 time=0.071 ms
root@container-04:~#
root@container-04:~# ping 10.0.0.162 -c3 |grep icmp
64 bytes from 10.0.0.162: icmp_seq=1 ttl=64 time=0.257 ms
64 bytes from 10.0.0.162: icmp_seq=2 ttl=64 time=0.071 ms
64 bytes from 10.0.0.162: icmp_seq=3 ttl=64 time=0.095 ms
root@container-04:~#
Terlihat diatas untuk linux container yang dibuat spesifik node sudah dapat digunakan. Anda sudah dapat menjalankan banyak linux container dan dapat menyesuaikan juga untuk node yang ingin Anda gunakan semua network yang digunakan linux container sifatnya bridge berikut cara melihat detail informasi network yang digunakan:
1
2
3
4
5
6
7
8
9
10
11
12
13
14
15
16
17
18
19
20
21
22
23
24
25
26
27
28
29
30
ubuntu@node01-lxd-blinux:~$
ubuntu@node01-lxd-blinux:~$ lxc network list
+--------+----------+---------+-------------+---------+---------+
|  NAME  |   TYPE   | MANAGED | DESCRIPTION | USED BY |  STATE  |
+--------+----------+---------+-------------+---------+---------+
| ens3   | physical | NO      |             | 0       |         |
+--------+----------+---------+-------------+---------+---------+
| lxdbr0 | bridge   | YES     |             | 4       | CREATED |
+--------+----------+---------+-------------+---------+---------+
ubuntu@node01-lxd-blinux:~$
ubuntu@node01-lxd-blinux:~$ lxc network show lxdbr0
config:
  ipv4.address: 10.0.0.1/24
  ipv4.nat: "true"
  ipv6.address: none
description: ""
name: lxdbr0
type: bridge
used_by:
- /1.0/instances/container-01
- /1.0/instances/container-02
- /1.0/instances/container-03
- /1.0/instances/container-04
managed: true
status: Created
locations:
- node-01
- node-02
- node-03
ubuntu@node01-lxd-blinux:~$
Sampai disini tutorial clustering di LXD sudah selesai dan masih banyak lagi yang perlu di eksplorasi tentang LXD. Jika terdapat pertanyaan dan atau ingin berdiskusi tentang LXD dapat melalui kolom komentar ya 😊.
Selamat mencoba 😁