

Pada kesempatan sebelumnya kita pernah membahas tentang Nginx Reverse Proxy dimana salah satu keuntungannya dapat menggunakan Load Balacing detailnya dapat di lihat pada link berikut: Memahami Cara Kerja Nginx Reverse Proxy
Web server Nginx mungkin bisa dibilang sebagai web server yang multi guna, karena Nginx dapat digunakan sebagai reverse proxy, caching, bahkan Load Balancer.
Load Balancer salah satu cara atau mekanisme untuk membagi atau mendistribusikan trafik ke beberapa server dan ini salah satu dari solusi high availability.
Load Balancer di Nginx terdapat 3 pilihan algoritma yang dapat Anda gunakan diantaranya:
Round Robin :
Jika Anda menggunakan algoritma Round Robin maka instance yang dijadikan sebagai Load Balancer akan mendistribusikan trafik ke setiap server (web server) secara bergantian.
Least Connections:
Jika Anda menggunakan algoritma Least Connection maka instance yang dijadikan sebagai load blancer akan mendristribusikan traffik ke server (web server) yang sedikit menerima koneksi aktif
_ IP Hash: _
Jika Anda menggunakan algoritma IP Hash maka instance yang dijadikan sebagai load balancer akan mendristribusikan traffi ke server (web server) yang sama ketika user atau visitor pertama kali request akses ke website.
Berikut topologi yang akan digunakan pada tutorial kali ini
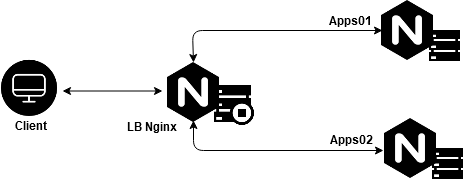
Berikut keterangan dari topologi diatas:
1
2
3
4
5
6
7
- Instance LB Nginx: Digunakan sebagai Load Balancer Nginx
  IP Local: 192.168.10.2
  IP Public: 103.93.52.117

- Instance Apps01 dan Apps02: Digunakan sebagai web server
  IP Local Apps01: 192.168.10.9
  IP Local Apps02: 192.168.10.18
Untuk set up LB di tutorial kali ini kami akan membagikan 3 tahapan diantaranya:
# Tahapan Pertama – Install Nginx dan Php-fpm di Apps01 dan Apps02
Tahapan pertama kami akan melakukan setup web server nginx di 2 instance web server sebagai berikut
Login ke VM/instance Apps01 install web server nginx
1
2
3
[root@apps01 ~]#
[root@apps01 ~]# dnf install nginx -y
[root@apps01 ~]#
Start dan enable Nginx pastikan statusnya running
1
2
3
4
5
6
7
8
9
10
11
12
13
14
15
16
17
18
19
20
[root@apps01 ~]# systemctl start nginx
[root@apps01 ~]# systemctl enable nginx
Created symlink /etc/systemd/system/multi-user.target.wants/nginx.service → /usr/lib/systemd/system/nginx.service.
[root@apps01 ~]# systemctl status nginx
● nginx.service - The nginx HTTP and reverse proxy server
   Loaded: loaded (/usr/lib/systemd/system/nginx.service; enabled; vendor preset: disabled)
   Active: active (running) since Fri 2020-08-28 06:16:13 UTC; 3min 46s ago
 Main PID: 6178 (nginx)
    Tasks: 2 (limit: 11328)
   Memory: 3.9M
   CGroup: /system.slice/nginx.service
           ├─6178 nginx: master process /usr/sbin/nginx
           └─6179 nginx: worker process

Aug 28 06:16:13 apps01.nurhamim.my.id systemd[1]: Starting The nginx HTTP and reverse proxy server...
Aug 28 06:16:13 apps01.nurhamim.my.id nginx[6175]: nginx: the configuration file /etc/nginx/nginx.conf syntax is ok
Aug 28 06:16:13 apps01.nurhamim.my.id nginx[6175]: nginx: configuration file /etc/nginx/nginx.conf test is successful
Aug 28 06:16:13 apps01.nurhamim.my.id systemd[1]: nginx.service: Failed to parse PID from file /run/nginx.pid: Invalid argument
Aug 28 06:16:13 apps01.nurhamim.my.id systemd[1]: Started The nginx HTTP and reverse proxy server.
[root@apps01 ~]#
Selanjutnya install php-fpm di Apps01, silakan install repositori remi terlebih dahulu
1
2
[root@apps01 ~]#
[root@apps01 ~]# dnf install dnf-utils http://rpms.remirepo.net/enterprise/remi-release-8.rpm
Jika sudah silakan install php module nya
1
2
[root@apps01 ~]#
[root@apps01 ~]# dnf install php php-opcache php-gd php-curl php-mysqlnd php-fpm -y
Untuk melihat versi php gunakan perintah berikut
1
2
3
4
5
6
7
[root@apps01 ~]#
[root@apps01 ~]# php --version
PHP 7.2.24 (cli) (built: Oct 22 2019 08:28:36) ( NTS )
Copyright (c) 1997-2018 The PHP Group
Zend Engine v3.2.0, Copyright (c) 1998-2018 Zend Technologies
    with Zend OPcache v7.2.24, Copyright (c) 1999-2018, by Zend Technologies
[root@apps01 ~]#
Silakan start, enable dan pastikan status php-fpm running
1
2
3
4
5
6
7
8
9
10
11
12
13
14
15
16
17
18
19
20
21
22
[root@apps01 ~]# systemctl start php-fpm
[root@apps01 ~]# systemctl enable php-fpm
Created symlink /etc/systemd/system/multi-user.target.wants/php-fpm.service → /usr/lib/systemd/system/php-fpm.service.
[root@apps01 ~]# systemctl status php-fpm
● php-fpm.service - The PHP FastCGI Process Manager
   Loaded: loaded (/usr/lib/systemd/system/php-fpm.service; enabled; vendor preset: disabled)
   Active: active (running) since Fri 2020-08-28 06:26:05 UTC; 14s ago
 Main PID: 6713 (php-fpm)
   Status: "Processes active: 0, idle: 5, Requests: 0, slow: 0, Traffic: 0req/sec"
    Tasks: 6 (limit: 11328)
   Memory: 23.8M
   CGroup: /system.slice/php-fpm.service
           ├─6713 php-fpm: master process (/etc/php-fpm.conf)
           ├─6714 php-fpm: pool www
           ├─6715 php-fpm: pool www
           ├─6716 php-fpm: pool www
           ├─6717 php-fpm: pool www
           └─6718 php-fpm: pool www

Aug 28 06:26:05 apps01.nurhamim.my.id systemd[1]: Starting The PHP FastCGI Process Manager...
Aug 28 06:26:05 apps01.nurhamim.my.id systemd[1]: Started The PHP FastCGI Process Manager.
[root@apps01 ~]#
Login ke VM/instance Apps02 install web server nginx dan start serta enable nginx, pastikan statusnya running
1
2
3
4
5
6
7
8
9
10
11
12
13
14
15
16
17
18
19
[root@apps02 ~]#
[root@apps02 ~]# dnf install nginx -y
[root@apps02 ~]# systemctl start nginx
[root@apps02 ~]# systemctl enable nginx
Created symlink /etc/systemd/system/multi-user.target.wants/nginx.service → /usr/lib/systemd/system/nginx.service.
[root@apps02 ~]# systemctl status nginx
● nginx.service - The nginx HTTP and reverse proxy server
   Loaded: loaded (/usr/lib/systemd/system/nginx.service; enabled; vendor preset: disabled)
   Active: active (running) since Fri 2020-08-28 06:09:02 UTC; 55s ago
 Main PID: 6454 (nginx)
    Tasks: 2 (limit: 11328)
   Memory: 3.9M
   CGroup: /system.slice/nginx.service
           ├─6454 nginx: master process /usr/sbin/nginx
           └─6455 nginx: worker process

Aug 28 06:09:02 apps02.nurhamim.my.id systemd[1]: Starting The nginx HTTP and reverse proxy server...
Aug 28 06:09:02 apps02.nurhamim.my.id nginx[6451]: nginx: the configuration file /etc/nginx/nginx.conf syntax is ok
Aug 28 06:09:02 apps02.nurhamim.my.id nginx[6451]: nginx: configuration file /etc/nginx/nginx.conf test is successful
Kemudian sama seperti di Apps01 silalan install php-fpm terlebih dahulu silakan install repository remi
1
2
[root@apps02 ~]#
[root@apps02 ~]# dnf install dnf-utils http://rpms.remirepo.net/enterprise/remi-release-8.rpm
Install php
1
2
[root@apps02 ~]#
[root@apps02 ~]# dnf install php php-opcache php-gd php-curl php-mysqlnd php-fpm -y
Untuk melihat versi php jalankan perintah berikut
1
2
3
4
5
6
7
[root@apps02 ~]#
[root@apps02 ~]# php --version
PHP 7.2.24 (cli) (built: Oct 22 2019 08:28:36) ( NTS )
Copyright (c) 1997-2018 The PHP Group
Zend Engine v3.2.0, Copyright (c) 1998-2018 Zend Technologies
    with Zend OPcache v7.2.24, Copyright (c) 1999-2018, by Zend Technologies
[root@apps02 ~]#
Silakan start, enable dan pastikan statusnya running
1
2
3
4
5
6
7
8
9
10
11
12
13
14
15
16
17
18
19
20
21
22
23
[root@apps02 ~]#
[root@apps02 ~]# systemctl start php-fpm
[root@apps02 ~]# systemctl enable php-fpm
Created symlink /etc/systemd/system/multi-user.target.wants/php-fpm.service → /usr/lib/systemd/system/php-fpm.service.
[root@apps02 ~]# systemctl status php-fpm
● php-fpm.service - The PHP FastCGI Process Manager
   Loaded: loaded (/usr/lib/systemd/system/php-fpm.service; enabled; vendor preset: disabled)
   Active: active (running) since Fri 2020-08-28 06:27:01 UTC; 7s ago
 Main PID: 7025 (php-fpm)
   Status: "Ready to handle connections"
    Tasks: 6 (limit: 11328)
   Memory: 23.8M
   CGroup: /system.slice/php-fpm.service
           ├─7025 php-fpm: master process (/etc/php-fpm.conf)
           ├─7026 php-fpm: pool www
           ├─7027 php-fpm: pool www
           ├─7028 php-fpm: pool www
           ├─7029 php-fpm: pool www
           └─7030 php-fpm: pool www

Aug 28 06:27:01 apps02.nurhamim.my.id systemd[1]: Starting The PHP FastCGI Process Manager...
Aug 28 06:27:01 apps02.nurhamim.my.id systemd[1]: Started The PHP FastCGI Process Manager.
[root@apps02 ~]#
# Tahapan Kedua – Buat Website sederhana di Apps01 dan Apps02
Login ke Instance Apps01 tentukan direktori root website Anda dan buat website serderhana misalnya menggunakan html seperti berikut
1
2
3
[root@apps01 ~]# mkdir -p /usr/share/nginx/belajarlinux
[root@apps01 ~]# echo "<h1>Apps01 | Belajar Linux ID</h1>" > /usr/share/nginx/belajarlinux/index.php
[root@apps01 ~]#
Selanjutnya membuat server block website Anda
1
2
[root@apps01 ~]#
[root@apps01 ~]# vim /etc/nginx/conf.d/belajarlinux.conf
Berikut isi dari konfigurasi server block nya
1
2
3
4
5
6
7
8
9
10
11
12
13
14
15
16
17
18
19
20
21
22
23
24
25
server {
    listen 80;

    server_name belajarlinux.nurhamim.my.id;
    root /usr/share/nginx/belajarlinux/;

    access_log /var/log/nginx/belajarlinux.access.log;
    error_log /var/log/nginx/belajarlinux.error.log warn;

    index index.php index.html index.htm;

    location / {
        try_files $uri $uri/ /index.php?$query_string;
    }

    location ~ \.php$ {
        try_files $fastcgi_script_name =404;
        include fastcgi_params;
        fastcgi_pass unix:/run/php-fpm/www.sock;
        fastcgi_index index.php;
        fastcgi_param DOCUMENT_ROOT $realpath_root;
        fastcgi_param SCRIPT_FILENAME $realpath_root$fastcgi_script_name;
    }

}
Noted: Silakan disesuaikan untuk server_name dan root direktorinya
Pastikan tidak ada konfigurasi yang salah di sisi server block dan silakan reload nginx
1
2
3
4
5
6
[root@apps01 ~]# nginx -t
nginx: the configuration file /etc/nginx/nginx.conf syntax is ok
nginx: configuration file /etc/nginx/nginx.conf test is successful
[root@apps01 ~]#
[root@apps01 ~]# nginx -s reload
[root@apps01 ~]#
Login ke Instance Apps02 tentukan direktori root website Anda dan buat website serderhana misalnya menggunakan html seperti berikut
1
2
[root@apps02 ~]# mkdir -p /usr/share/nginx/belajarlinux
[root@apps02 ~]# echo "<h1>Apps02 | Belajar Linux ID</h1>" > /usr/share/nginx/belajarlinux/index.php
Selanjutnya membuat server block website Anda
1
2
[root@apps02 ~]#
[root@apps02 ~]# vim /etc/nginx/conf.d/belajarlinux.conf
Berikut isi dari konfigurasi server block nya
1
2
3
4
5
6
7
8
9
10
11
12
13
14
15
16
17
18
19
20
21
22
23
24
25
server {
    listen 80;

    server_name belajarlinux.nurhamim.my.id;
    root /usr/share/nginx/belajarlinux/;

    access_log /var/log/nginx/belajarlinux.access.log;
    error_log /var/log/nginx/belajarlinux.error.log warn;

    index index.php index.html index.htm;

    location / {
        try_files $uri $uri/ /index.php?$query_string;
    }

    location ~ \.php$ {
        try_files $fastcgi_script_name =404;
        include fastcgi_params;
        fastcgi_pass unix:/run/php-fpm/www.sock;
        fastcgi_index index.php;
        fastcgi_param DOCUMENT_ROOT $realpath_root;
        fastcgi_param SCRIPT_FILENAME $realpath_root$fastcgi_script_name;
    }

}
Noted: Silakan disesuaikan untuk server_name dan root direktorinya
Pastikan tidak ada konfigurasi yang salah di sisi server block dan silakan reload nginx
1
2
3
4
5
[root@apps02 ~]# nginx -t
nginx: the configuration file /etc/nginx/nginx.conf syntax is ok
nginx: configuration file /etc/nginx/nginx.conf test is successful
[root@apps02 ~]#
[root@apps02 ~]# nginx -s reload
# Tahap Ketiga – Set up Load Balancer Nginx
Silakan login ke instance Load balancer, dan install nginx
1
2
3
4
5
[root@lb-nginx ~]#
[root@lb-nginx ~]# dnf install epel-release -y

[root@lb-nginx ~]#
[root@lb-nginx ~]# dnf install nginx -y
Silakan start, enable dan pastikan nginx running
1
2
3
4
5
6
7
8
9
10
11
12
13
14
15
16
17
18
19
20
21
22
[root@lb-nginx ~]#
[root@lb-nginx ~]# systemctl start nginx
[root@lb-nginx ~]# systemctl enable nginx
Created symlink /etc/systemd/system/multi-user.target.wants/nginx.service → /usr/lib/systemd/system/nginx.service.
[root@lb-nginx ~]#
[root@lb-nginx ~]# systemctl status nginx
● nginx.service - The nginx HTTP and reverse proxy server
   Loaded: loaded (/usr/lib/systemd/system/nginx.service; enabled; vendor preset: disabled)
   Active: active (running) since Fri 2020-08-28 06:42:20 UTC; 8s ago
 Main PID: 6990 (nginx)
    Tasks: 2 (limit: 11326)
   Memory: 3.9M
   CGroup: /system.slice/nginx.service
           ├─6990 nginx: master process /usr/sbin/nginx
           └─6991 nginx: worker process

Aug 28 06:42:20 lb-nginx.nurhamim.my.id systemd[1]: Starting The nginx HTTP and reverse proxy server...
Aug 28 06:42:20 lb-nginx.nurhamim.my.id nginx[6987]: nginx: the configuration file /etc/nginx/nginx.conf syntax is ok
Aug 28 06:42:20 lb-nginx.nurhamim.my.id nginx[6987]: nginx: configuration file /etc/nginx/nginx.conf test is successful
Aug 28 06:42:20 lb-nginx.nurhamim.my.id systemd[1]: nginx.service: Failed to parse PID from file /run/nginx.pid: Invalid argument
Aug 28 06:42:20 lb-nginx.nurhamim.my.id systemd[1]: Started The nginx HTTP and reverse proxy server.
[root@lb-nginx ~]#
Membuat konfigurasi Load Balancer Nginx
1
2
[root@lb-nginx ~]#
[root@lb-nginx ~]# vim /etc/nginx/conf.d/lb-belajarlinux.conf
Berikut full konfigurasi Nginx Load Balancer nya
1
2
3
4
5
6
7
8
9
10
11
12
13
14
15
16
17
upstream backendapps {
    server 192.168.10.9; #apps01
    server 192.168.10.18; #apps02
}

server {
    listen 80;
    server_name belajarlinux.nurhamim.my.id;

    location / {
        proxy_redirect off;
        proxy_set_header X-Real-IP $remote_addr;
        proxy_set_header X-Forwarded-For $proxy_add_x_forwarded_for;
        proxy_set_header Host $http_host;
        proxy_pass http://backendapps;
    }
}
Noted: Silahkan sesuai IP setiap backend/node/apps01 dan apps02 nya.
Secara default algoritma yang digunakan diatas yaitu round robin, jika Anda ingin menggunakan algortima last connection atau ip hash Anda hanya perlu menambahkan satu baris perintah dibawah upstream contohnya:
1
2
3
4
5
6
7
8
9
10
11
12
13
14
15
# LEAST CONNECTION

upstream backendapps {
    least_conn;
    server 192.168.10.9; #apps01
    server 192.168.10.18; #apps02
}

# IP HASH

upstream backendapps {
    ip_hash;
    server 192.168.10.9; #apps01
    server 192.168.10.18; #apps02
}
Jika sudah silakan simpan konfigurasinya, dan pastikan tidak terdapat kesalahan di konfigurasi server block dan silakan reload nginx
1
2
3
4
5
6
7
[root@lb-nginx ~]#
[root@lb-nginx ~]# nginx -t
nginx: the configuration file /etc/nginx/nginx.conf syntax is ok
nginx: configuration file /etc/nginx/nginx.conf test is successful
[root@lb-nginx ~]#
[root@lb-nginx ~]# nginx -s reload
[root@lb-nginx ~]#
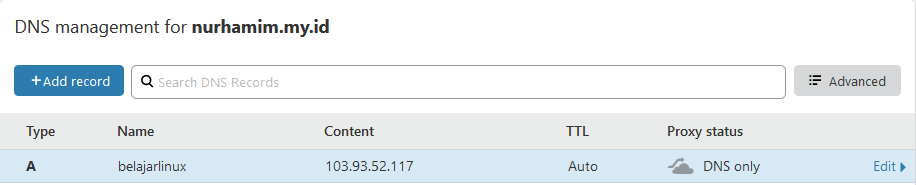
Langkah terakhir pastikan subdomain belajarlinux.nurhamim.my.id sudah diarahkan ke public IP Load Balancer
Test Load Balancer dengan cara akses subdomain tersebut
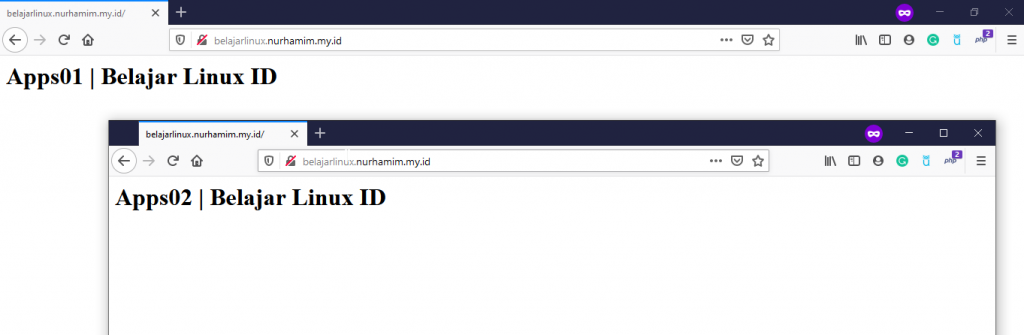
Selamat Load Balancer Nginx Anda sudah berjalan.
Selamat mencoba.