
Belajar Linux ID - WordPress merupakan sebuah CMS (content management system) open source yang dapat digunakan secara bebas dan WordPress salah satu CMS yang sangat populer dan banyak digunakan dari berbagai kalangan karena WordPress sangat mudah digunakan bahkan di custom sesuai kebutuhan Anda.
WordPress dapat dijalankan diberbagai macam platform mulai dari shared, dedicated, VPS, VM dan yang lainnya bahkan wordpress juga dapat dijalankan di Docker container, namun pada tutorial kali ini kami akan bahas bagaimana cara menjalankan WordPress di Linux container (LXD).
Berikut merupakan topologi yang digunakan:
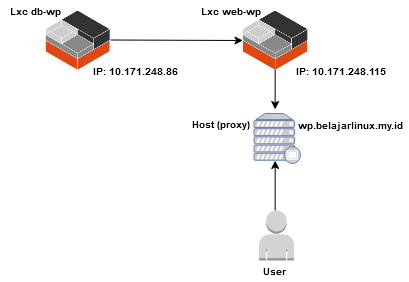
Keterangan:
-
Terdapat 2 linux container
- 1 Linux container (web)
- OS: Ubuntu 20.04
- IP: 10.171.248.115
- Service: Apache2, PHP 7.4
- 1 Linux container (database)
- OS: CentOS 8
- IP: 10.171.248.86
- Service: MariaDB
- 1 Linux container (web)
-
Host: Digunakan sebagai proxy
Untuk mengikuti tutorial kali ini pastikan Anda sudah mempunya 2 linux container dengan service yang telah diinformasikan diatas, Anda dapat merujuk pada link berikut untuk tutorialnya:
- Cara Install Web Server Apache dan PHP di Linux Container (LXD)
- Cara Install MariaDB di Linux Container (LXD)
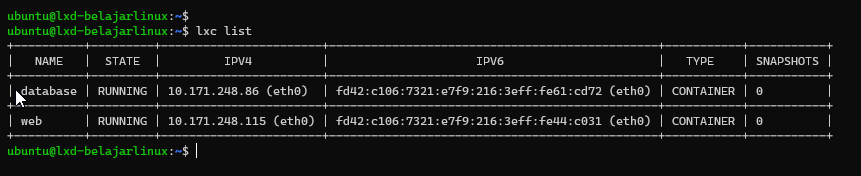
Berikut list linux container yang digunakan:
Konfigurasi Linux Container Database
Untuk tahap ini pastikan Anda sudah install database MariaDB dan sudah ada akses root untuk membuat database mariadb.
Silakan login ke linux container database untuk membuat database wordpress
1
2
3
ubuntu@lxd-belajarlinux:~$
ubuntu@lxd-belajarlinux:~$ lxc exec database bash
[root@database ~]#
Buat database wordpress dan pastikan user database listen ke IP linux container web
1
2
3
4
5
6
7
8
9
10
11
12
13
14
15
16
17
18
19
20
21
22
23
24
25
26
27
[root@database ~]#
[root@database ~]# mysql -u root -p
Enter password:
Welcome to the MariaDB monitor.  Commands end with ; or \g.
Your MariaDB connection id is 17
Server version: 10.3.17-MariaDB MariaDB Server

Copyright (c) 2000, 2018, Oracle, MariaDB Corporation Ab and others.

Type 'help;' or '\h' for help. Type '\c' to clear the current input statement.

MariaDB [(none)]>
MariaDB [(none)]> CREATE DATABASE wordpress;
Query OK, 1 row affected (0.001 sec)

MariaDB [(none)]> CREATE USER 'wpuser'@'10.171.248.115' IDENTIFIED BY 'password';
Query OK, 0 rows affected (0.004 sec)

MariaDB [(none)]> GRANT ALL PRIVILEGES ON wordpress.* TO 'wpuser'@'10.171.248.115';
Query OK, 0 rows affected (0.004 sec)

MariaDB [(none)]> FLUSH PRIVILEGES;
Query OK, 0 rows affected (0.002 sec)

MariaDB [(none)]> exit
Bye
[root@database ~]#
Konfigurasi Linux Container Web
Silakan login ke linux container web menggunakan shell bash
1
2
3
ubuntu@lxd-belajarlinux:~$
ubuntu@lxd-belajarlinux:~$ lxc exec web bash
root@web:~#
Install utilisasi yang dibutuhkan
1
2
root@web:~#
root@web:~# apt install curl wget zip unzip -y
Install PHP 7.4 dan extension PHP yang dibutuhkan oleh WordPress
1
2
root@web:~#
root@web:~# apt install php7.4-mbstring php7.4-xml php7.4-mysql php7.4-common php7.4-gd php7.4-bcmath php7.4-json php7.4-cli php7.4-curl php7.4-zip
Download WordPress versi latest
1
2
3
4
5
6
7
8
9
10
11
12
13
14
root@web:~#
root@web:~# wget https://wordpress.org/latest.zip
--2020-12-28 05:15:56--  https://wordpress.org/latest.zip
Resolving wordpress.org (wordpress.org)... 198.143.164.252
Connecting to wordpress.org (wordpress.org)|198.143.164.252|:443... connected.
HTTP request sent, awaiting response... 200 OK
Length: 16528923 (16M) [application/zip]
Saving to: ‘latest.zip’

latest.zip                                      100%[=====================================================================================================>]  15.76M  5.42MB/s    in 2.9s

2020-12-28 05:16:00 (5.42 MB/s) - ‘latest.zip’ saved [16528923/16528923]

root@web:~#
Unzip file WordPress ke direktori /var/www
1
2
root@web:~#
root@web:~# unzip latest.zip -d /var/www/
Ubah nama direktori default (wordpress) menjadi nama domain atau subdomain contoh disini kami menggunakan subdomain wp.belajarlinux.my.id
1
2
3
root@web:~#
root@web:~# mv /var/www/wordpress/ /var/www/wp.belajarlinux.my.id
root@web:~#
Test koneksi database yang telah dibuat sebelumnya di linux container database, silakan install terlebih dahulu mariadb-client dan pastikan php-mysql sudah terinstall di linux container web
1
2
root@web:~#
root@web:~# apt install mariadb-client php-mysql
Test koneksi database
1
2
3
4
5
6
7
8
9
10
11
12
root@web:~#
root@web:~# mysql -u wpuser -h 10.171.248.86 -p
Enter password:
Welcome to the MariaDB monitor.  Commands end with ; or \g.
Your MariaDB connection id is 20
Server version: 10.3.17-MariaDB MariaDB Server

Copyright (c) 2000, 2018, Oracle, MariaDB Corporation Ab and others.

Type 'help;' or '\h' for help. Type '\c' to clear the current input statement.

MariaDB [(none)]>
Saat ini database sudah terhubung ke linux container web. Selanjutnya melakukan konfigurasi pada WordPress dengan cara pindah ke direktori root WordPress dan copy default wp-config-sample.php menjadi wp-config.php
1
root@web:/var/www/wp.belajarlinux.my.id# cp wp-config-sample.php wp-config.php
Kemudian, buak file wp-config.php dan sesuaikan konfigurasi database mulai dari (nama database, username database dan IP database
1
root@web:/var/www/wp.belajarlinux.my.id# vim wp-config.php
Seperti berikut ini:
1
2
3
4
5
6
7
8
9
10
11
12
13
14
15
/ ** MySQL settings - You can get this info from your web host ** //
/** The name of the database for WordPress */
define( 'DB_NAME', 'wordpress' );

/** MySQL database username */
define( 'DB_USER', 'wpuser' );

/** MySQL database password */
define( 'DB_PASSWORD', 'password' );

/** MySQL hostname */
define( 'DB_HOST', '10.171.248.86' );

/** Database Charset to use in creating database tables. */
define( 'DB_CHARSET', 'utf8' );
Selanjutnya untuk kebutuhan security silakan generate security has random tujuannya untuk enkripsi data login WordPress: WordPress Security Key Generator
Tambahkan di wp-config.php seperti berikut
1
2
3
4
5
6
7
8
define( 'AUTH_KEY',         'l|qFf&>NN^Pxs$kp+qT]|!Y0Y(pjiMD^.3lW/Eg7)`|{3Xs_|=ItmJ&!JelYdHGE' );
define( 'SECURE_AUTH_KEY',  '1z1J9#|+xeBacW<`yY$EuyZ_X-HN0l-qt[ukG7bJEJu<,yr0(G|O G#c*@[Rzf8!' );
define( 'LOGGED_IN_KEY',    'AFTTWX~hr{/>{?s^dd@ eg6;oPS9N(VJF1O-.zi%gg~[_qY.z1MYc.[moe{7/*No' );
define( 'NONCE_KEY',        ')raJ{N>Aa]=$fo+IT0g$8$H)Cz(EjX%!_dT5MKw[NK<aRdyO?[Y70`.uAN>wrz,J' );
define( 'AUTH_SALT',        't>r#H58w5whyxho3iGS6,BRE,97I7_Haa7FTS]0T_8ICe~uM^No;9ltO]h.6ddx<' );
define( 'SECURE_AUTH_SALT', 'd?*WfC&l(0G<|%u0K0]rR#k~<NR`%ZqA<Hd8!SVUMF(-+q+~|p6`vB{Mz7$kWNwy' );
define( 'LOGGED_IN_SALT',   'j;M1K)h}VF3V];7`1}LTT<3l/oEd-J0Rp~V>&_/2wked}Woi==:HnVtx7,jE-3D{' );
define( 'NONCE_SALT',       'ha|vH7CC3y5)ti.*q KLDJEx1Z=L* 2]f6]!mr^t5T;W$p#X6=-_@zsZ[oMQDDqF' );
Jika sudah selanjutnya membuat virtual host apache
1
2
root@web:/var/www/wp.belajarlinux.my.id#
root@web:/var/www/wp.belajarlinux.my.id# vim /etc/apache2/sites-available/wp.belajarlinux.my.id.conf
Berikut contoh konfigurasi virtual host apache
1
2
3
4
5
6
7
8
9
10
11
12
<VirtualHost *:80>
        ServerName wp.belajarlinux.my.id
        DocumentRoot /var/www/wp.belajarlinux.my.id

        #This enables .htaccess file, which is needed for WordPress Permalink to work.
        <Directory "/var/www/wp.belajarlinux.my.id">
             AllowOverride All
        </Directory>

        ErrorLog ${APACHE_LOG_DIR}/wp_blinux.error.log
        CustomLog ${APACHE_LOG_DIR}/wp_blinux.access.log combined
</VirtualHost>
Noted: Silakan sesuaikan servername dan dokument root sesuai kondisi masing-masing
Jika sudah silakan simpan konfigurasi diatas dan pastikan konfigurasi apache sudah benar semua dengan cara verifikasi menggunakan perintah
1
2
3
root@web:/var/www/wp.belajarlinux.my.id# apache2ctl configtest
Syntax OK
root@web:/var/www/wp.belajarlinux.my.id#
Buat link konfigurasi apache dan reload apache web server
1
2
3
4
5
6
root@web:/var/www/wp.belajarlinux.my.id# a2ensite wp.belajarlinux.my.id
Enabling site wp.belajarlinux.my.id.
To activate the new configuration, you need to run:
  systemctl reload apache2
root@web:/var/www/wp.belajarlinux.my.id# systemctl reload apache2
root@web:/var/www/wp.belajarlinux.my.id#
Sampai disisi konfigurasi web server dan PHP sudah selesai dilakukan.
Instalasi WordPress
Pastikan Anda sudah pointing subdomain/domain (jika menggunakan domain) yang Anda tentukan di server name virtual host sebelumnya
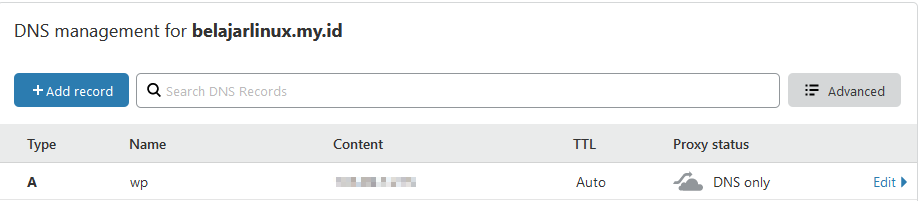
Akses wp.belajarlinux.my.id melalui browser untuk lanjut ke tahapan instalasi
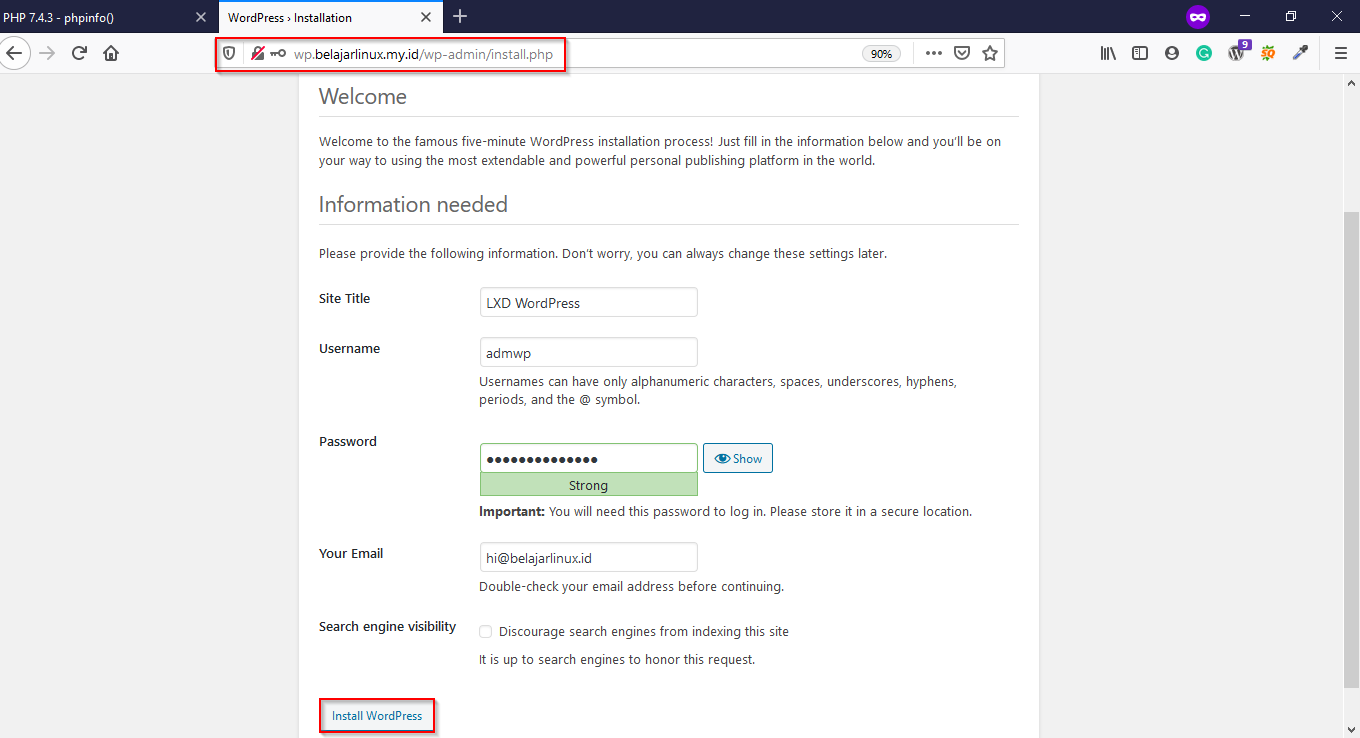
Isi Site Title, Username, Password, dan Email lalu klik Install WordPress
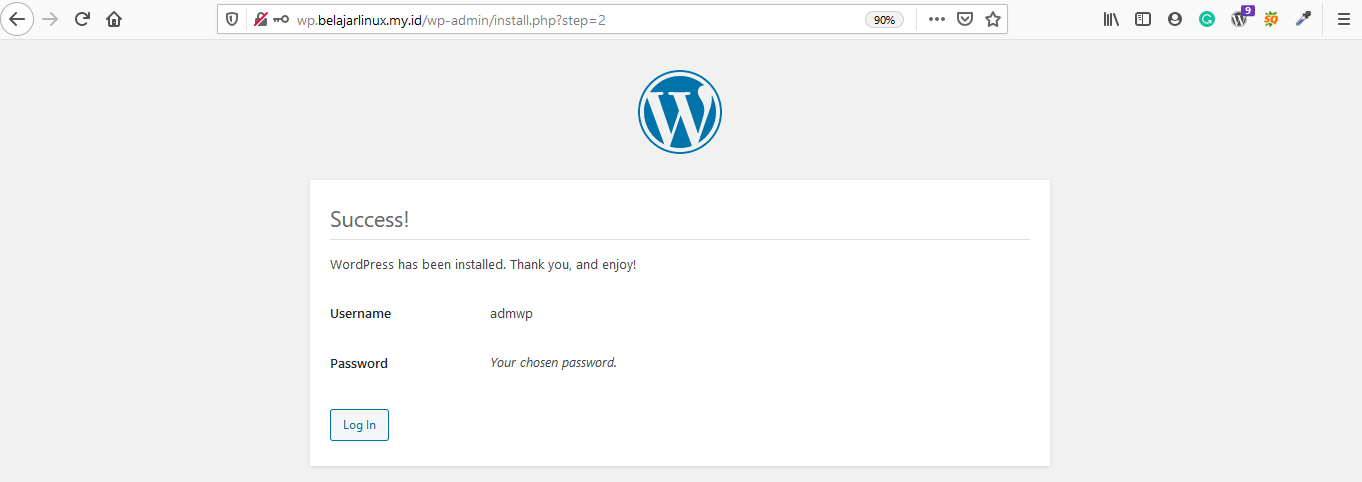
Jika hasilnya seperti gambar diatas, maka instalasi sudah berhasil dilakukan silakan klik Log In untuk login ke halaman Administrator WordPress, seperti gambar dibawah ini
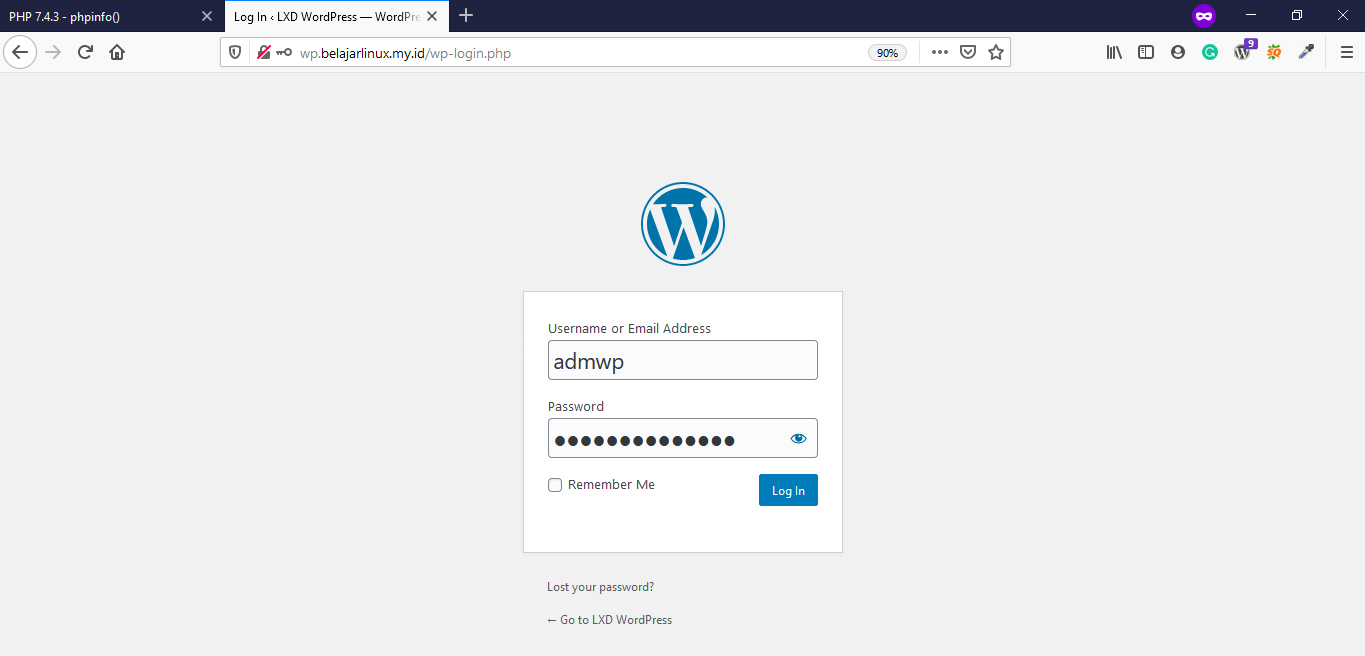
Input username dan password yang sudah ditentukan sebelumnya, jika berhasil Anda akan diarahkan ke halama Administrator WordPress
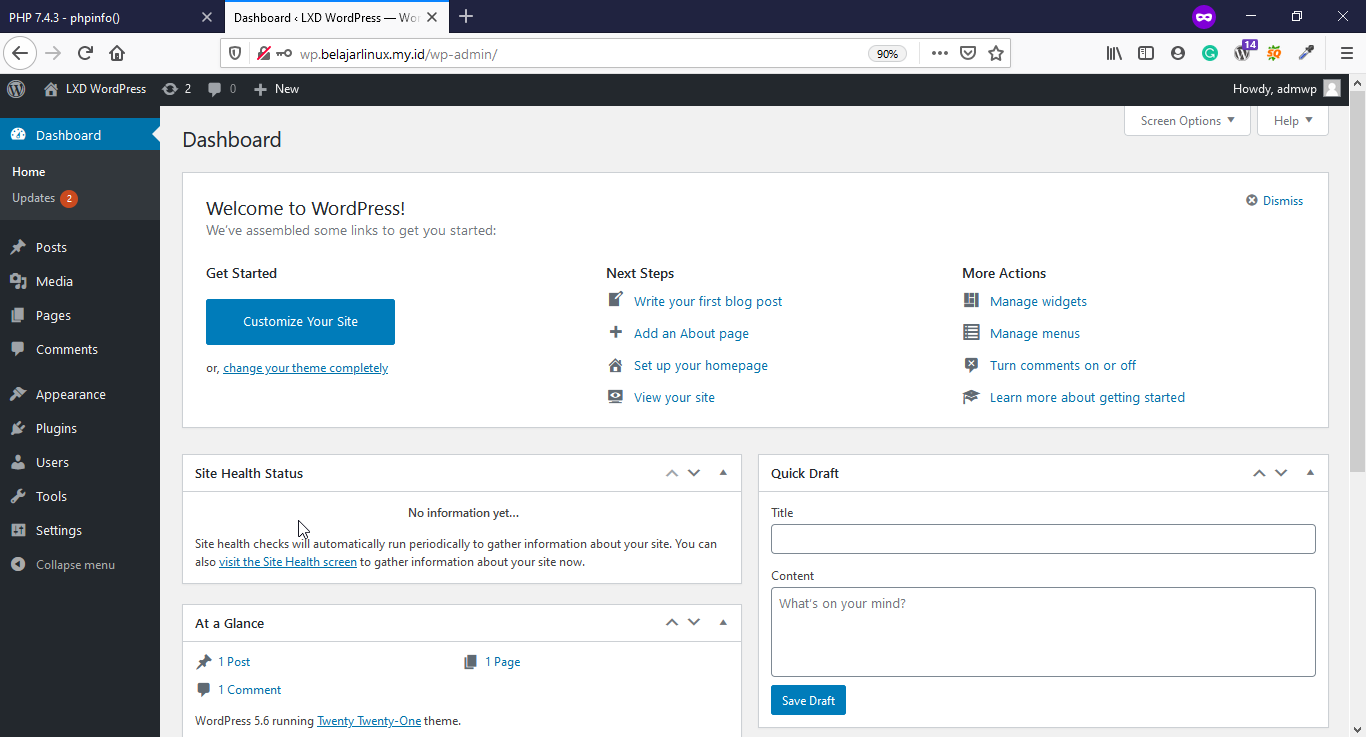
Sampai disini Anda sudah berhasil instalasi CMS WordPress di Linux container.
Selamat mencoba 😁