Cara Install Let's Encrypt pada HAProxy di CentOS 8

Letsencrypt salah satu SSL (Secure Sockets Layer) free yang dapat Anda gunakan Letsencrypt dapat Anda install di berbagai sistem operasi, dan web server. Untuk instalasi letsencrypt dapat menggunakan Certbot
Sebelum melakukan instalasi certbot kita perlu install epel repository terlebih dahulu seperti berikut
1
2
[root@haproxy ~]#
[root@haproxy ~]# dnf install epel-release -y
Selanjutnya install certbot menggunakan perintah berikut
1
2
[root@haproxy ~]#
[root@haproxy ~]# dnf install certbot -y
Stop HAProxy nya terlebih dahulu dan pastikan tidak ada yang listen ke port 80
1
2
3
[root@haproxy ~]# systemctl stop haproxy
[root@haproxy ~]# netstat -na | grep ':80.*LISTEN'
[root@haproxy ~]#
Selanjutnya generate dan menerbitkan certificate SSL letsencrypt
1
2
[root@haproxy ~]#
[root@haproxy ~]# certbot certonly --standalone --preferred-challenges http --http-01-port 80 -d wp-ha.nurhamim.my.id
Noted: Ubah wp-ha.nurhamim.my.id dengan nama domain atau subdomain HAProxy Anda
Jika berhasil akan ada pesan atau output seperti berikut
1
2
3
4
5
6
7
8
9
10
11
12
13
14
15
16
17
18
IMPORTANT NOTES:
 - Congratulations! Your certificate and chain have been saved at:
   /etc/letsencrypt/live/wp-ha.nurhamim.my.id/fullchain.pem
   Your key file has been saved at:
   /etc/letsencrypt/live/wp-ha.nurhamim.my.id/privkey.pem
   Your cert will expire on 2020-12-02. To obtain a new or tweaked
   version of this certificate in the future, simply run certbot
   again. To non-interactively renew *all* of your certificates, run
   "certbot renew"
 - If you like Certbot, please consider supporting our work by:

   Donating to ISRG / Let's Encrypt: https://letsencrypt.org/donate
   Donating to EFF: https://eff.org/donate-le

 - We were unable to subscribe you the EFF mailing list because your
   e-mail address appears to be invalid. You can try again later by
   visiting https://act.eff.org.
[root@haproxy ~]#
Lihat SSL yang sudah di generate di direktori /etc/letsencrypt/live
1
2
3
4
[root@haproxy ~]#
[root@haproxy ~]# ls /etc/letsencrypt/live
README wp-ha.nurhamim.my.id
[root@haproxy ~]#
Membuat direktori _ certs di direktori haproxy_
1
2
[root@haproxy ~]# mkdir -p /etc/haproxy/certs
[root@haproxy ~]#
Gabungkan SSL wp-ha.nurhamim.my.id menggunakan cat seperti berikut
1
2
3
[root@haproxy ~]#
[root@haproxy ~]# DOMAIN='wp-ha.nurhamim.my.id' sudo -E bash -c 'cat /etc/letsencrypt/live/$DOMAIN/fullchain.pem /etc/letsencrypt/live/$DOMAIN/privkey.pem > /etc/haproxy/certs/$DOMAIN.pem'
[root@haproxy ~]#
Noted: Sesuaikan wp-ha.nurhamim.my.id dengan nama domain atau subdomain SSL Anda
Berikan permission berikut, pada direktori /etc/haproxy/certs
1
2
3
[root@haproxy ~]#
[root@haproxy ~]# chmod -R go-rwx /etc/haproxy/certs
[root@haproxy ~]#
Konfigurasi HAProxy
1
2
[root@haproxy ~]#
[root@haproxy ~]# vim /etc/haproxy/haproxy.cfg
Berikut isi full konfigurasi HAProxy
1
2
3
4
5
6
7
8
9
10
11
12
13
14
15
16
17
18
19
20
21
22
23
24
25
26
27
28
29
30
31
32
33
34
35
36
37
38
39
40
41
42
43
44
45
46
47
48
49
global
        log /dev/log local0
        log /dev/log local1 notice
        chroot /var/lib/haproxy
        stats timeout 30s
        user haproxy
        group haproxy
        daemon
        tune.ssl.default-dh-param 2048

defaults
        log global
        mode http
        option httplog
        option dontlognull
        timeout connect 5000
        timeout client 50000
        timeout server 50000

frontend www-http
        bind *:80
        reqadd X-Forwarded-Proto:\ http
        stats uri /haproxy?stats
        default_backend www-backend


frontend www-https
        bind *:443 ssl crt /etc/haproxy/certs/wp-ha.nurhamim.my.id.pem
        reqadd X-Forwarded-Proto:\ https
        acl letsencrypt-acl path_beg /.well-known/acme-challenge/
        use_backend letsencrypt-backend if letsencrypt-acl
        default_backend www-backend

backend www-backend
        redirect scheme https if !{ ssl_fc }
        server wp01 192.168.10.2:80 check
        server wp02 192.168.10.24:80 check

backend letsencrypt-backend
        server letsencrypt 127.0.0.1:54321

listen stats
        bind *:2233 ssl crt /etc/haproxy/certs/wp-ha.nurhamim.my.id.pem
        stats enable
        stats hide-version
        stats refresh 30s
        stats show-node
        stats auth username:password
        stats uri /stats
Noted: Silakan sesuaikan bagian ssl dengan menambahkan /etc/haproxy/certs/wp-ha.nurhamim.my.id.pem
Simpan konfigurasi HAProxy nya dan silakan start dan pastikan status HAProxy running
1
2
3
4
5
6
7
8
9
10
11
12
13
14
15
16
17
18
19
20
21
22
23
24
25
[root@haproxy ~]#
[root@haproxy ~]# systemctl start haproxy
[root@haproxy ~]# systemctl status haproxy -l
● haproxy.service - HAProxy Load Balancer
   Loaded: loaded (/usr/lib/systemd/system/haproxy.service; disabled; vendor preset: disabled)
   Active: active (running) since Thu 2020-09-03 19:12:17 UTC; 3s ago
  Process: 12408 ExecStartPre=/usr/sbin/haproxy -f $CONFIG -c -q (code=exited, status=0/SUCCESS)
 Main PID: 12409 (haproxy)
    Tasks: 2 (limit: 11328)
   Memory: 6.7M
   CGroup: /system.slice/haproxy.service
           ├─12409 /usr/sbin/haproxy -Ws -f /etc/haproxy/haproxy.cfg -p /run/haproxy.pid
           └─12411 /usr/sbin/haproxy -Ws -f /etc/haproxy/haproxy.cfg -p /run/haproxy.pid

Sep 03 19:12:17 haproxy.nurhamim.my.id haproxy[12409]: Proxy www-http started.
Sep 03 19:12:17 haproxy.nurhamim.my.id haproxy[12409]: Proxy www-https started.
Sep 03 19:12:17 haproxy.nurhamim.my.id haproxy[12409]: Proxy www-https started.
Sep 03 19:12:17 haproxy.nurhamim.my.id haproxy[12409]: Proxy www-backend started.
Sep 03 19:12:17 haproxy.nurhamim.my.id haproxy[12409]: Proxy www-backend started.
Sep 03 19:12:17 haproxy.nurhamim.my.id haproxy[12409]: Proxy letsencrypt-backend started.
Sep 03 19:12:17 haproxy.nurhamim.my.id haproxy[12409]: Proxy letsencrypt-backend started.
Sep 03 19:12:17 haproxy.nurhamim.my.id haproxy[12409]: Proxy stats started.
Sep 03 19:12:17 haproxy.nurhamim.my.id haproxy[12409]: Proxy stats started.
Sep 03 19:12:17 haproxy.nurhamim.my.id systemd[1]: Started HAProxy Load Balancer.
[root@haproxy ~]#
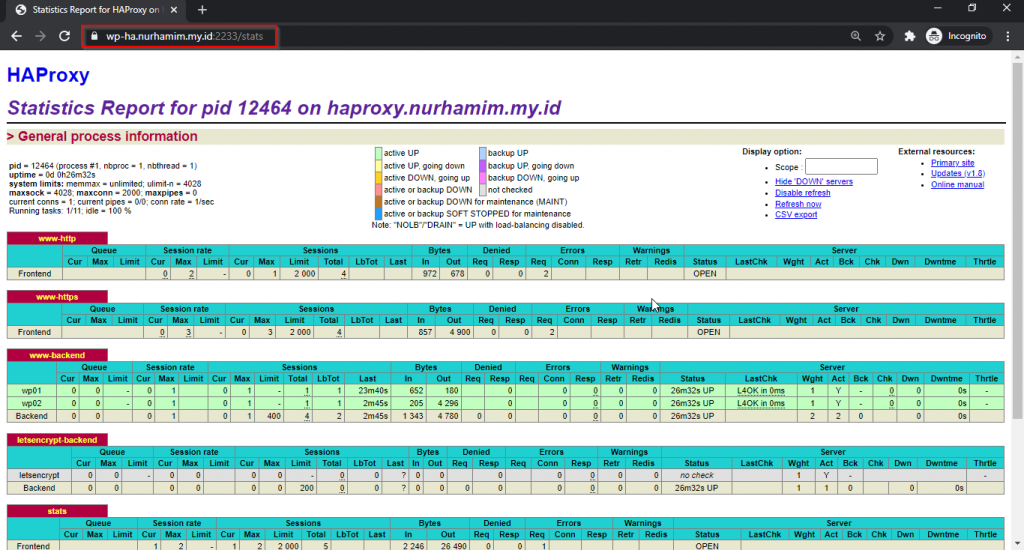
Akses HAProxy Anda melalui web browser dan isikan password login ke HAProxy nya

Saat ini HAProxy sudah terinstall SSL letsencrypt

Saat ini SSL sudah issued menggunakan letsencrypt

Selamat mencoba 😁

